dubbo使用简单介绍与启动流程以及请求响应流程
一、使用
1、服务端
Dubbo配置:
@Configuration
public class DubboConfiguration {

    @Value("${dubbo.protocol.port}")
    private int port;


    @Value("${server.port}")
    private String httpGateWayPort;

    //
    @Bean
    public ApplicationConfig applicationConfig() {
        ApplicationConfig applicationConfig = new ApplicationConfig();
        applicationConfig.setName("nacos-provider-test");
        applicationConfig.setRegistry(registryConfig());
        return applicationConfig;
    }

    @Bean
    public RegistryConfig registryConfig() {
        RegistryConfig registryConfig = new RegistryConfig();
        registryConfig.setAddress("nacos://127.0.0.1:80");
//        registryConfig.setAddress("zookeeper://127.0.0.1:2181");
        return registryConfig;
    }


    @Bean
    public ProtocolConfig protocolConfig() {
        ProtocolConfig protocolConfig = new ProtocolConfig();
        protocolConfig.setPort(port);
        protocolConfig.setTransporter("netty4");
        protocolConfig.setThreadpool("fixed");
        protocolConfig.setThreads(500);
        return protocolConfig;
    }

    @Bean
    public GateWayProcessor gateWayProcessor() {
        return new GateWayProcessor(String.valueOf(port));
    }

}
配置定义了应用配置,注册中心,协议配置等。
暴露服务:
@Service(interfaceClass = BankStatmentService.class,version = "1.0.0")
public class BankStatmentServiceImpl implements BankStatmentService {

}
通过上述的配置和定义,springboot启动后,Dubbo服务也会启动,并注册到nacos注册中心。
二、启动流程介绍
其实在之前的一篇文章,有过简单的介绍: Java的NIO及Netty
dubbo和spring整合可以通过XML配置和注解两种方式实现。
XML属于传统的spring配置方法,在spring中由一种机制叫做XML扩展机制Schema,用于定义和配置 Bean。 它允许开发者自定义 XML bean 解析器,并将解析器本身以及最终定义的 Bean 集成到 Spring IOC 容器中。
Dubbo实现了spring 的NamespaceHandler接口:DubboNamespaceHandler。该接口的初始化方法:
public void init() {
        this.registerBeanDefinitionParser("application", new DubboBeanDefinitionParser(ApplicationConfig.class, true));
        this.registerBeanDefinitionParser("module", new DubboBeanDefinitionParser(ModuleConfig.class, true));
        this.registerBeanDefinitionParser("registry", new DubboBeanDefinitionParser(RegistryConfig.class, true));
        this.registerBeanDefinitionParser("monitor", new DubboBeanDefinitionParser(MonitorConfig.class, true));
        this.registerBeanDefinitionParser("provider", new DubboBeanDefinitionParser(ProviderConfig.class, true));
        this.registerBeanDefinitionParser("consumer", new DubboBeanDefinitionParser(ConsumerConfig.class, true));
        this.registerBeanDefinitionParser("protocol", new DubboBeanDefinitionParser(ProtocolConfig.class, true));
        this.registerBeanDefinitionParser("service", new DubboBeanDefinitionParser(ServiceBean.class, true));
        this.registerBeanDefinitionParser("reference", new DubboBeanDefinitionParser(ReferenceBean.class, false));
        this.registerBeanDefinitionParser("annotation", new AnnotationBeanDefinitionParser());
    }
另外一种方式是注解方式,也是目前springboot中多数采用的一种,@Service,@Reference。对应的处理器是ServiceAnnotationBeanPostProcessor和ReferenceAnnotationBeanPostProcessor。其主要目的都是生成对应的Bean。
先看下服务端(都说注解方式的):
@Service(interfaceClass = GoodService.class,version = "1.0.0")
整体流程:
1、根据注解,Dubbo会创建Bean;
2、根据事件监听机制,触发实例化的ServiceBean暴露服务;
3、向注册中心注册服务;
现在具体说一下服务启动流程(dubbo:2.7.3)。
1、serviceBean的初始化
spring在初始化的过程中会在实例化Bean前、实例化之后等各个流程中执行一些processor,主要目的是实现一些自定义的特性。ServiceAnnotationBeanPostProcessor实现了BeanDefinitionRegistryPostProcessor。具体spring容器启动流程可参考: https://blog.csdn.net/qq_35190492/article/details/110383213
ServiceAnnotationBeanPostProcessor的postProcessBeanDefinitionRegistry方法负责注册所有的Servicebean,即使用service注解的。它会扫描指定的package。在应用中可以指定:
@EnableDubbo(scanBasePackages = "com.hbnnmall.hbnnmallproduct.service")
部分注册Bean的代码:
private void registerServiceBeans(Set<String> packagesToScan, BeanDefinitionRegistry registry) {

        DubboClassPathBeanDefinitionScanner scanner =
                new DubboClassPathBeanDefinitionScanner(registry, environment, resourceLoader);

        BeanNameGenerator beanNameGenerator = resolveBeanNameGenerator(registry);

        scanner.setBeanNameGenerator(beanNameGenerator);

        //添加了Service注解过滤器
        scanner.addIncludeFilter(new AnnotationTypeFilter(Service.class));

        /**
         * Add the compatibility for legacy Dubbo's @Service
         *
         * The issue : https://github.com/apache/dubbo/issues/4330
         * @since 2.7.3
         */
        scanner.addIncludeFilter(new AnnotationTypeFilter(com.alibaba.dubbo.config.annotation.Service.class));

        for (String packageToScan : packagesToScan) {

        ......
          }

}
2、Dubbo服务的启动
ServiceBean是继承InitializingBean, DisposableBean, ApplicationContextAware, ApplicationListener等。其中ApplicationListener就是一种事件机制,其中有个onApplicationEvent方法,就是dubbo服务启动的入口,实例化之后springboot会向所有的listener发布事件。通过打段点,debug可发现,触发该方法的是:
org.springframework.context.event.ContextRefreshedEvent,目前spring存在的事件包括:
- ContextRefreshedEvent:Spring应用上下文就绪事件;
- ContextStartedEvent: Spring应用上下文启动事件;
- ContextStopedEvent: Spring应用上下文停止事件;
- ContextClosedEvent: Spring应用上下文关闭事件;
public void onApplicationEvent(ContextRefreshedEvent event) {
        if (!this.isExported() && !this.isUnexported()) {
            if (logger.isInfoEnabled()) {
                logger.info("The service ready on spring started. service: " + this.getInterface());
            }

            this.export();
        }

    }
上述方法直接调用的是ServiceConfig的export方法,主要是服务暴露的流程。
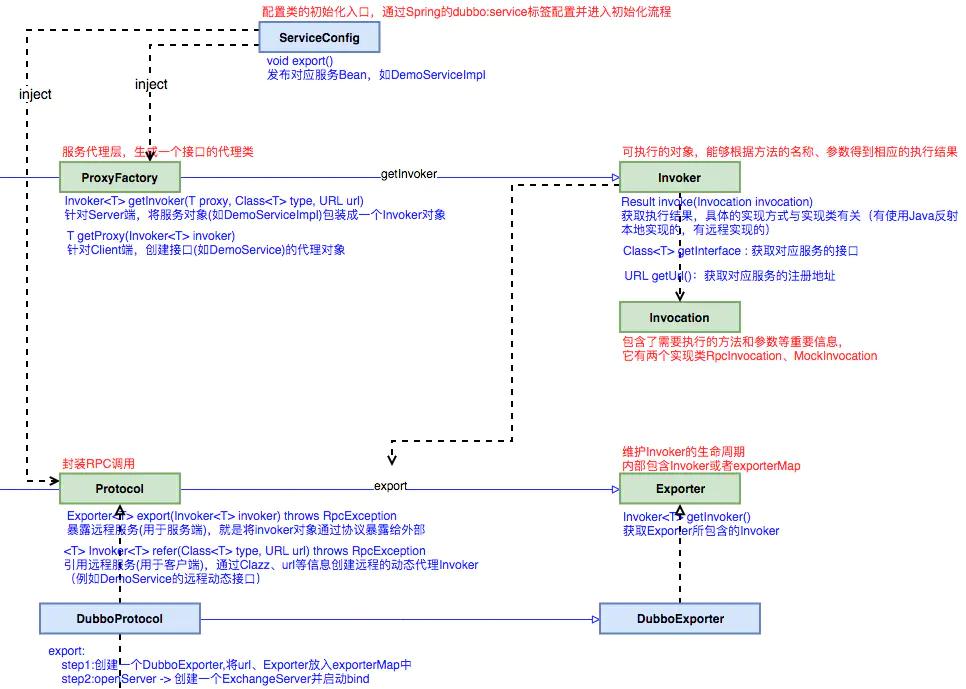
先来一张服务的整体流程示意图(来自网络):
public synchronized void export(ClassLoader classLoader) {
        if (this.provider != null) {
            if (this.export == null) {
                this.export = this.provider.getExport();
            }

            if (this.delay == null) {
                this.delay = this.provider.getDelay();
            }
        }

        if (this.export == null || this.export) {
            if (this.delay != null && this.delay > 0) {
                delayExportExecutor.schedule(this::doExport, (long)this.delay, TimeUnit.MILLISECONDS);
            } else {
                this.doExport2(classLoader);
            }

        }
    }
首先是各种环境配置检测。
         completeCompoundConfigs();
        // Config Center should always being started first.
        startConfigCenter();
        checkDefault();
        checkProtocol();
        checkApplication();
        // if protocol is not injvm checkRegistry
        if (!isOnlyInJvm()) {
            checkRegistry();
        }
        this.refresh();
        checkMetadataReport();
doExportUtls会根据protocols循环调用doExportUrlsFor1Protocol()方法。
   private void doExportUrls() {
        List<URL> registryURLs = loadRegistries(true);
        for (ProtocolConfig protocolConfig : protocols) {
            String pathKey = URL.buildKey(getContextPath(protocolConfig).map(p -> p + "/" + path).orElse(path), group, version);
            ProviderModel providerModel = new ProviderModel(pathKey, ref, interfaceClass);
            ApplicationModel.initProviderModel(pathKey, providerModel);
            doExportUrlsFor1Protocol(protocolConfig, registryURLs);
        }
    }
如果我们配置了多个协议,每个协议都会完成一次服务暴露。
doExportUrlsFor1Protocol最重要的部分:
通过代理获取invoker。代理ProxyFactory是通过Dubbo SPI机制获取的。
   Invoker<?> invoker = PROXY_FACTORY.getInvoker(ref, (Class) interfaceClass, registryURL.addParameterAndEncoded(EXPORT_KEY, url.toFullString()));
                        DelegateProviderMetaDataInvoker wrapperInvoker = new DelegateProviderMetaDataInvoker(invoker, this);

                        Exporter<?> exporter = protocol.export(wrapperInvoker);
                        exporters.add(exporter);
Dubbo接口在拓展方法被调用时,根据URL动态生成接口的Adaptive自适应拓展类,根据URL中用户指定的参数key,调用ExtensionLoader.getExtensionLoader(XXXClass).getExtension(key)来获取具体的实现类。
URL类似如下:
provider://10.239.33.161:12348/com.mi.youpin.finance.service.BankStatmentService?anyhost=true&application=nacos-provider-test&category=configurators&check=false&dubbo=2.0.2&dubbo_version=2.7.0_0.0.3_2019-01-08&generic=false&interface=com.msi.y.finance.service.BankStatmentService&methods=getMerchantCFBankstatment,getMerchantDaishouBankstatment&pid=9764&revision=1.0.0&side=provider&threadpool=fixed&threads=500×tamp=1581036916787&transporter=netty4&version=1.0.0, dubbo version: 2.7.0-msi-SNAPSHOT, current host: 10.239.33.161 [AbstractRegistry.java : 380] [WARN ] [com.alibaba.nacos.naming.client.listener]
private static final Protocol protocol = (Protocol)ExtensionLoader.getExtensionLoader(Protocol.class).getAdaptiveExtension();
getAdaptiveExtension()涉及到的代码很多。
对于protocol,它会根据Protocol接口,生成自动扩展类Protocol@Adaptive。
package com.alibaba.dubbo.rpc;

import com.alibaba.dubbo.common.extension.ExtensionLoader;

public class Protocol$Adaptive implements com.alibaba.dubbo.rpc.Protocol {
    public void destroy() {
        throw new UnsupportedOperationException("method public abstract void com.alibaba.dubbo.rpc.Protocol.destroy()" +
                " of interface com.alibaba.dubbo.rpc.Protocol is not adaptive method!");
    }

    public int getDefaultPort() {
        throw new UnsupportedOperationException("method public abstract int com.alibaba.dubbo.rpc.Protocol" +
                ".getDefaultPort() of interface com.alibaba.dubbo.rpc.Protocol is not adaptive method!");
    }

    public com.alibaba.dubbo.rpc.Invoker refer(java.lang.Class arg0, com.alibaba.dubbo.common.URL arg1) throws com.alibaba.dubbo.rpc.RpcException {
        if (arg1 == null) throw new IllegalArgumentException("url == null");
        com.alibaba.dubbo.common.URL url = arg1;
        String extName = (url.getProtocol() == null ? "dubbo" : url.getProtocol());
        if (extName == null)
            throw new IllegalStateException("Fail to get extension(com.alibaba.dubbo.rpc.Protocol) name from url(" + url.toString() + ") use keys([protocol])");
        com.alibaba.dubbo.rpc.Protocol extension =
                (com.alibaba.dubbo.rpc.Protocol) ExtensionLoader.getExtensionLoader(com.alibaba.dubbo.rpc.Protocol.class).getExtension(extName);
        return extension.refer(arg0, arg1);
    }

    public com.alibaba.dubbo.rpc.Exporter export(com.alibaba.dubbo.rpc.Invoker arg0) throws com.alibaba.dubbo.rpc.RpcException {
        if (arg0 == null) throw new IllegalArgumentException("com.alibaba.dubbo.rpc.Invoker argument == null");
        if (arg0.getUrl() == null)
            throw new IllegalArgumentException("com.alibaba.dubbo.rpc.Invoker argument getUrl() == null");
        com.alibaba.dubbo.common.URL url = arg0.getUrl();
        String extName = (url.getProtocol() == null ? "dubbo" : url.getProtocol());
        if (extName == null)
            throw new IllegalStateException("Fail to get extension(com.alibaba.dubbo.rpc.Protocol) name from url(" + url.toString() + ") use keys([protocol])");
        com.alibaba.dubbo.rpc.Protocol extension =
                (com.alibaba.dubbo.rpc.Protocol) ExtensionLoader.getExtensionLoader(com.alibaba.dubbo.rpc.Protocol.class).getExtension(extName);
        return extension.export(arg0);
    }
}
看到上面代码也可以看到,最后仍然是通过key找到实现类的。
现在看一下如何实现服务注册发现的。服务暴露的注册url(url是很重要的, url作为解耦的通信数据(跨层调用的参数),有了它dubbo就可以更容易做到业务逻辑实现的替换。除此之外可以看到url中还包含了大量的辅助参数(例如:timeout,version,organization等)供服务治理使用),注册url如下:
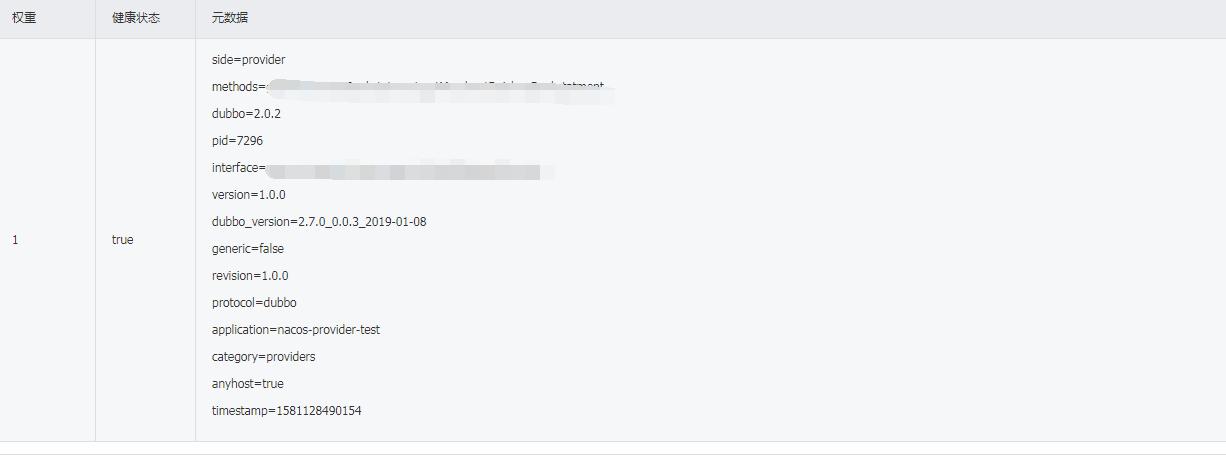
Register dubbo service com.finance.service.IFinanceTest url dubbo://10.23.50.31:12348/com.finance.service.IFinanceTest?anyhost=true&application=nacos-provider-test&bind.ip=10.23.50.31&bind.port=12348&dubbo=2.0.2&dubbo_version=2.7.0_0.0.3_2019-01-08&generic=false&interface=com.finance.service.IFinanceTest&methods=listBs&pid=7296&revision=1.0.0&side=provider×tamp=1581128490232&version=1.0.0 to registry registry://10.238.63.218:80/org.apache.dubbo.registry.RegistryService?application=nacos-provider-test&dubbo=2.0.2&dubbo_version=2.7.0_0.0.3_2019-01-08&pid=7296®istry=nacos×tamp=1581128490185, dubbo version: 2.7.0-SNAPSHOT, current host: 10.23.50.31
对于有registerUrl的,会调用RegisterProtocol的export方法。
根据上面的registry: 就可以拿到对应的protocol,上面在Protocol@Adaptive,已经有过介绍了。此时按到的是RegisterProtocol。接下来会执行其export方法。
2.7.3版本的将把Server启动等过程,放到了这里。
  @Override
    public <T> Exporter<T> export(final Invoker<T> originInvoker) throws RpcException {
        URL registryUrl = getRegistryUrl(originInvoker);
        // url to export locally
        URL providerUrl = getProviderUrl(originInvoker);

        // Subscribe the override data
        // FIXME When the provider subscribes, it will affect the scene : a certain JVM exposes the service and call
        //  the same service. Because the subscribed is cached key with the name of the service, it causes the
        //  subscription information to cover.
        final URL overrideSubscribeUrl = getSubscribedOverrideUrl(providerUrl);
        final OverrideListener overrideSubscribeListener = new OverrideListener(overrideSubscribeUrl, originInvoker);
        overrideListeners.put(overrideSubscribeUrl, overrideSubscribeListener);

        providerUrl = overrideUrlWithConfig(providerUrl, overrideSubscribeListener);
        //export invoker
        final ExporterChangeableWrapper<T> exporter = doLocalExport(originInvoker, providerUrl);

        // url to registry
        final Registry registry = getRegistry(originInvoker);
        final URL registeredProviderUrl = getRegisteredProviderUrl(providerUrl, registryUrl);
        ProviderInvokerWrapper<T> providerInvokerWrapper = ProviderConsumerRegTable.registerProvider(originInvoker,
                registryUrl, registeredProviderUrl);
        //to judge if we need to delay publish
        boolean register = registeredProviderUrl.getParameter("register", true);
        if (register) {
            register(registryUrl, registeredProviderUrl);
            providerInvokerWrapper.setReg(true);
        }

        // Deprecated! Subscribe to override rules in 2.6.x or before.
        registry.subscribe(overrideSubscribeUrl, overrideSubscribeListener);

        exporter.setRegisterUrl(registeredProviderUrl);
        exporter.setSubscribeUrl(overrideSubscribeUrl);
        //Ensure that a new exporter instance is returned every time export
        return new DestroyableExporter<>(exporter);
    }
上面说先获得了两个url,一个是注册地址,一个是服务provider地址。
final ExporterChangeableWrapper<T> exporter = doLocalExport(originInvoker, providerUrl);
该语句会export具体的invoker。
 private <T> ExporterChangeableWrapper<T> doLocalExport(final Invoker<T> originInvoker, URL providerUrl) {
        String key = getCacheKey(originInvoker);

        return (ExporterChangeableWrapper<T>) bounds.computeIfAbsent(key, s -> {
            Invoker<?> invokerDelegate = new InvokerDelegate<>(originInvoker, providerUrl);
            return new ExporterChangeableWrapper<>((Exporter<T>) protocol.export(invokerDelegate), originInvoker);
        });
    }
同样地,根据Dubbo自适应扩展,根据providerUrl,这里面有各种协议,比如dubbo,会调用DubboProtocol的export,真正开始启动nettyServer,开启服务。
  @Override
    public <T> Exporter<T> export(Invoker<T> invoker) throws RpcException {
        URL url = invoker.getUrl();

        // export service.
        String key = serviceKey(url);
        DubboExporter<T> exporter = new DubboExporter<T>(invoker, key, exporterMap);
        exporterMap.put(key, exporter);

        //export an stub service for dispatching event
        Boolean isStubSupportEvent = url.getParameter(STUB_EVENT_KEY, DEFAULT_STUB_EVENT);
        Boolean isCallbackservice = url.getParameter(IS_CALLBACK_SERVICE, false);
        if (isStubSupportEvent && !isCallbackservice) {
            String stubServiceMethods = url.getParameter(STUB_EVENT_METHODS_KEY);
            if (stubServiceMethods == null || stubServiceMethods.length() == 0) {
                if (logger.isWarnEnabled()) {
                    logger.warn(new IllegalStateException("consumer [" + url.getParameter(INTERFACE_KEY) +
                            "], has set stubproxy support event ,but no stub methods founded."));
                }

            } else {
                stubServiceMethodsMap.put(url.getServiceKey(), stubServiceMethods);
            }
        }

        openServer(url);
        optimizeSerialization(url);

        return exporter;
    }
开启本地服务,就要将服务注册到注册中心。
Registry registry = this.getRegistry(originInvoker),它的作用就是获取实际注册的实现类;
看一下他的实现:
 private Registry getRegistry(Invoker<?> originInvoker) {
        URL registryUrl = this.getRegistryUrl(originInvoker);
        return this.registryFactory.getRegistry(registryUrl);
    }
上面的RegistryFactory仍然是一个SPI扩展。
@SPI("dubbo")
public interface RegistryFactory {
    @Adaptive({"protocol"})
    Registry getRegistry(URL var1);
}
随后会调用:AbstractRegistryFactory.getRegistry方法。
 public Registry getRegistry(URL url) {
        url = url.setPath(RegistryService.class.getName()).addParameter("interface", RegistryService.class.getName()).removeParameters(new String[]{"export", "refer"});
        String key = url.toServiceStringWithoutResolving();
        LOCK.lock();

        Registry var4;
        try {
            //根据key获取注册类
            Registry registry = (Registry)REGISTRIES.get(key);
            if (registry == null) {
                registry = this.createRegistry(url);
                if (registry == null) {
                    throw new IllegalStateException("Can not create registry " + url);
                }

                REGISTRIES.put(key, registry);
                var4 = registry;
                return var4;
            }

            var4 = registry;
        } finally {
            LOCK.unlock();
        }

        return var4;
    }
上面就是获取注册实现类的具体过程,本文例子拿到的是NacosRegistry。拿到后要向注册中心注册暴露的url.
registry.register(registedProviderUrl); //向注册中心注册当前暴露的服务的URL
这个register是子类尽进行重载的方法。
继承关系 NacosRegistry->FailbackRegistry->AbstractRegistry
FailbackRegistry进行了重载:
public void register(URL url) {
        super.register(url);
        this.removeFailedRegistered(url);
        this.removeFailedUnregistered(url);

        try {
            this.doRegister(url);
        } catch (Exception var6) {
            Throwable t = var6;
            boolean check = this.getUrl().getParameter("check", true) && url.getParameter("check", true) && !"consumer".equals(url.getProtocol());
            boolean skipFailback = var6 instanceof SkipFailbackWrapperException;
            if (check || skipFailback) {
                if (skipFailback) {
                    t = var6.getCause();
                }

                throw new IllegalStateException("Failed to register " + url + " to registry " + this.getUrl().getAddress() + ", cause: " + ((Throwable)t).getMessage(), (Throwable)t);
            }

            this.logger.error("Failed to register " + url + ", waiting for retry, cause: " + var6.getMessage(), var6);
            this.addFailedRegistered(url);
        }

    }
看到上面的方法会调用实现类的doRegister,这里就是NacosRegistry的doRegister.
  public void doRegister(URL url) {
        final String serviceName = this.getServiceName(url);
        final Instance instance = this.createInstance(url);
        this.execute(new NacosRegistry.NamingServiceCallback() {
            public void callback(NamingService namingService) throws NacosException {
                namingService.registerInstance(serviceName, instance);
            }
        });
    }
上面方法中,首先要创建一个实例:
 private Instance createInstance(URL url) {
        String category = url.getParameter("category", "providers");
        URL newURL = url.addParameter("category", category);
        newURL = newURL.addParameter("protocol", url.getProtocol());
        String ip = NetUtils.getLocalHost();
        int port = newURL.getParameter("bind.port", url.getPort());
        Instance instance = new Instance();
        instance.setIp(ip);
        instance.setPort(port);
        instance.setMetadata(new HashMap(newURL.getParameters()));
        return instance;
    }
上面的实例包含分类,协议,ip,port以及元数据等等。元数据就是dubbo版本等等.
创建实例后,要注册到注册中心:
 public void registerInstance(String serviceName, Instance instance) throws NacosException {
        BeatInfo beatInfo = new BeatInfo();
        beatInfo.setDom(serviceName);
        beatInfo.setIp(instance.getIp());
        beatInfo.setPort(instance.getPort());
        beatInfo.setCluster(instance.getClusterName());
        beatInfo.setWeight(instance.getWeight());
        beatInfo.setMetadata(instance.getMetadata());
        this.beatReactor.addBeatInfo(serviceName, beatInfo);
        this.serverProxy.registerService(serviceName, instance);
    }


   public void registerService(String serviceName, Instance instance) throws NacosException {
        LogUtils.LOG.info("REGISTER-SERVICE", "registering service " + serviceName + " with instance:" + instance);
        Map<String, String> params = new HashMap(8);
        params.put("tenant", this.namespace);
        params.put("ip", instance.getIp());
        params.put("port", String.valueOf(instance.getPort()));
        params.put("weight", String.valueOf(instance.getWeight()));
        params.put("enable", String.valueOf(instance.isEnabled()));
        params.put("healthy", String.valueOf(instance.isHealthy()));
        params.put("metadata", JSON.toJSONString(instance.getMetadata()));
        params.put("serviceName", serviceName);
        params.put("clusterName", instance.getClusterName());
        this.reqAPI("/nacos/v1/ns/instance", params, (String)"PUT");
    }
具体注册就不说了,总之是发了一个HTTP请求。
注册中心接收到服务会给订阅者(也就是消费方)发送消息,消费方接到消息需要做的事情:
- 更新服务提供方配置规则
- 更新路由规则
- 重建invoker实例
再看一下消费端。
消费端启动流程:
同样,根据Reference注解,生成Referencebean实例,该Bean class implement InitializingBean,实例化时,会执行afterPropertiesSet。
主要步骤:
1、ReferenceAnnotationBeanPostProcessor负责Reference Bean的实例化和注册;
2、ReferenceBean实例化时会加载各种配置;
3、创建一个消费者代理,用于进行实际的服务调用。
       ref = createProxy(map);

        String serviceKey = URL.buildKey(interfaceName, group, version);
        ApplicationModel.initConsumerModel(serviceKey, buildConsumerModel(serviceKey, attributes));
        initialized = true;
创建时主要做的几件事
1、是否使用同一jvm中的服务提供者(本地调用)
2、如果是远程调用会检查注册中心;
3、构造invoker。如果是多个服务提供着,就构造ClusterInvoker,这是Dubbo封装的可处理集群容错的Cluster Invoker,它支持不同的处理容错的方式,比如自动切换,快速失败等等,具体可参考: Dubbo集群
Invoker的构建会调用DubboProtocol的refer
public <T> Invoker<T> refer(Class<T> serviceType, URL url) throws RpcException {
        this.optimizeSerialization(url);
        DubboInvoker<T> invoker = new DubboInvoker(serviceType, url, this.getClients(url), this.invokers);
        this.invokers.add(invoker);
        return invoker;
    }
4、将consumer注册到注册中心;
5、 监听调用服务的providers,configurators,routers节点的数据变化 ,随着注册中心数据的变化动态刷新invoker列表。监听由具体的Registry完成,比如ZK,可以监听某些子节点的变化。
6、将providers节点下的所有匹配的providerURL转换成Invoker(每个invoker包装着一个client)
7、创建代理
当我们进行远程调用的时,直接调用invoker代理的invoke方法,如果时Cluster,会根据配置的具体实现类进行远程调用,Dubbo默认会采用FailOver自动切换,其会使用负载均衡组件完成路由选择,执行远程调用。
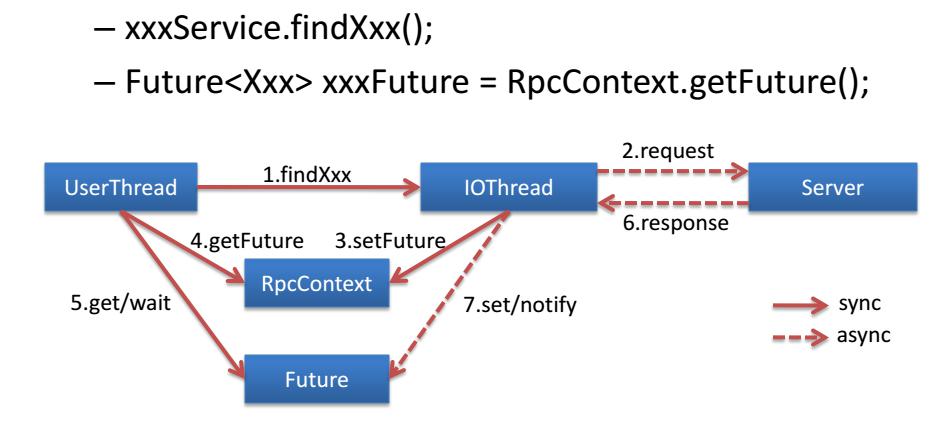
请求响应流程
一个基本的请求处理示意图:
首先说下服务消费方的调用过程。
现在我们调用了一个sayHello的一个远程方法。那么首先会创建一个Proxy代理(调用ReferenceConfig.createProxy),然后调用Protocol的refer方法。
    public <T> Invoker<T> refer(Class<T> serviceType, URL url) throws RpcException {
        this.optimizeSerialization(url);
        DubboInvoker<T> invoker = new DubboInvoker(serviceType, url, this.getClients(url), this.invokers);
        this.invokers.add(invoker);
        return invoker;
    }
DubboInvoker负责请求的封装,发送和返回响应结果。
protected Result doInvoke(Invocation invocation) throws Throwable {
RpcInvocation inv = (RpcInvocation)invocation;
String methodName = RpcUtils.getMethodName(invocation);
inv.setAttachment("path", this.getUrl().getPath());
inv.setAttachment("version", this.version);
ExchangeClient currentClient;
if (this.clients.length == 1) {
currentClient = this.clients[0];
} else {
currentClient = this.clients[this.index.getAndIncrement() % this.clients.length];
}
try {
boolean isAsync = RpcUtils.isAsync(this.getUrl(), invocation);
boolean isAsyncFuture = RpcUtils.isGeneratedFuture(inv) || RpcUtils.isFutureReturnType(inv);
boolean isOneway = RpcUtils.isOneway(this.getUrl(), invocation);
int timeout = this.getUrl().getMethodParameter(methodName, "timeout", 1000);
int clientTimeout = Integer.parseInt(invocation.getAttachment("timeout", "-1"));
if (clientTimeout > 0) {
timeout = clientTimeout;
}
if (isOneway) {
boolean isSent = this.getUrl().getMethodParameter(methodName, "sent", false);
currentClient.send(inv, isSent);
RpcContext.getContext().setFuture((Future)null);
return new RpcResult();
} else if (isAsync) {
ResponseFuture future = currentClient.request(inv, timeout);
FutureAdapter<Object> futureAdapter = new FutureAdapter(future);
RpcContext.getContext().setFuture(futureAdapter);
Object result;
if (isAsyncFuture) {
result = new AsyncRpcResult(futureAdapter, futureAdapter.getResultFuture(), false);
} else {
result = new SimpleAsyncRpcResult(futureAdapter, futureAdapter.getResultFuture(), false);
}
return (Result)result;
} else {
RpcContext.getContext().setFuture((Future)null);
//阻塞等待响应结果
return (Result)currentClient.request(inv, timeout).get();
}
} catch (TimeoutException var13) {
throw new RpcException(2, "Invoke remote method timeout. method: " + invocation.getMethodName() + ", provider: " + this.getUrl() + ", cause: " + var13.getMessage(), var13);
} catch (RemotingException var14) {
throw new RpcException(1, "Failed to invoke remote method: " + invocation.getMethodName() + ", provider: " + this.getUrl() + ", cause: " + var14.getMessage(), var14);
}
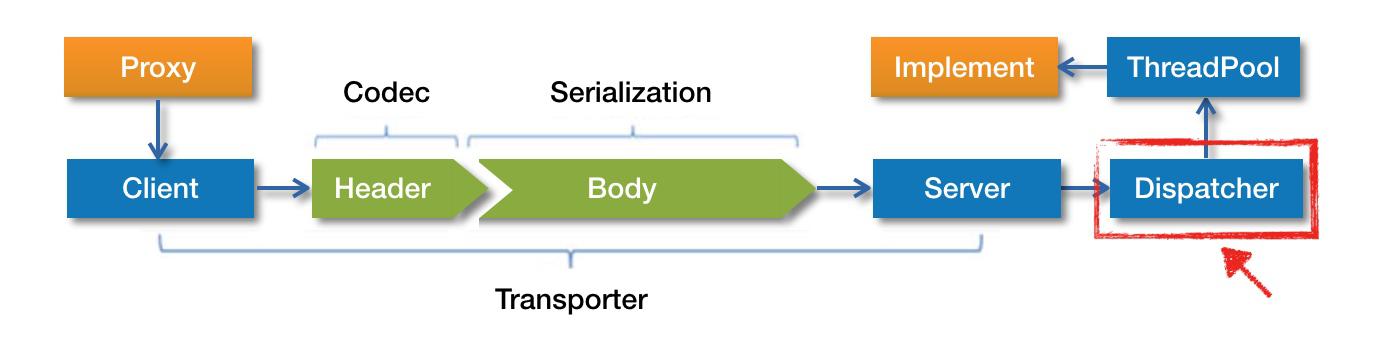
}关于具体的请求响应流程,我本来想自己写了,但看到官网已经写的比较详细了,没有必要再赘述了,官网服务调用过程: Dubbo服务调用过程 。 关于Netty的详细介绍,在我之前的文章里有。
我这里就简单描述一下,首先拿到网上的一张图,比较好:
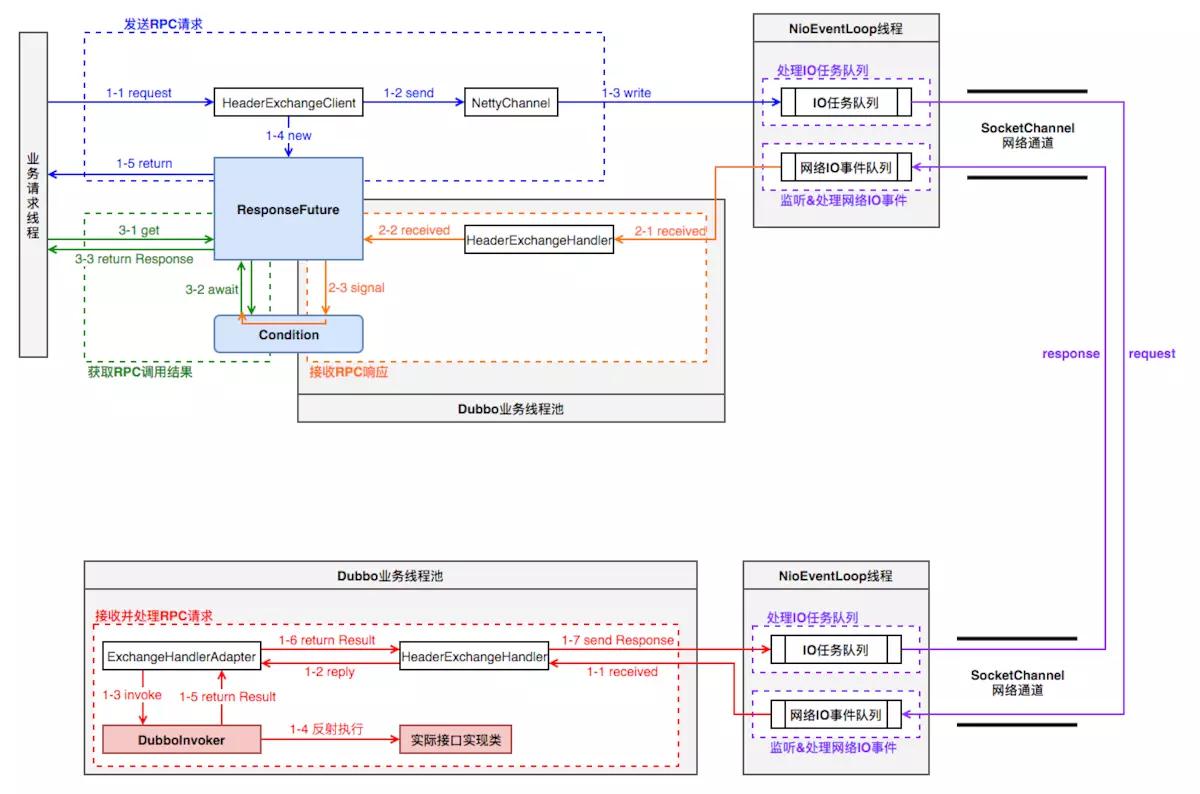
简单流程:
1、当请求来到时,由业务线程通过NettyChannel注册到IO线程中,并返回ResponseFuture对象(异步处理关键,类似Netty的ChannelFuture),用户线程会调用DefaultFuture 的 get 方法等待响应对象的到来。
2、IO主线程负责任务事件的分发,会将任务派发到IO工作线程中。
3、工作线程会将事件封装成任务,放到业务线程中执行。业务线程会先后调用DecodeHander(请求数据解码),随后调用HeaderExchangeHandler,该Handler调用后面的Handler,且封装响应,并返回响应结果。后向Handler就是DubboProtocol的匿名Handler:requestHandler。该方法会通过invoke的方式调用服务。
看一下代码:
public void received(Channel channel, Object message) throws RemotingException {
        channel.setAttribute(KEY_READ_TIMESTAMP, System.currentTimeMillis());
        HeaderExchangeChannel exchangeChannel = HeaderExchangeChannel.getOrAddChannel(channel);

        try {
            if (message instanceof Request) {
                Request request = (Request)message;
                if (request.isEvent()) {
                    this.handlerEvent(channel, request);
                } else if (request.isTwoWay()) {
                    //处理请求
                    this.handleRequest(exchangeChannel, request);
                } else {
                    this.handler.received(exchangeChannel, request.getData());
                }
            } else if (message instanceof Response) {
                handleResponse(channel, (Response)message);
            } else if (message instanceof String) {
                if (isClientSide(channel)) {
                    Exception e = new Exception("Dubbo client can not supported string message: " + message + " in channel: " + channel + ", url: " + channel.getUrl());
                    logger.error(e.getMessage(), e);
                } else {
                    String echo = this.handler.telnet(channel, (String)message);
                    if (echo != null && echo.length() > 0) {
                        channel.send(echo);
                    }
                }
            } else {
                this.handler.received(exchangeChannel, message);
            }
        } finally {
            HeaderExchangeChannel.removeChannelIfDisconnected(channel);
        }

    }
随后会调用handleRequest
void handleRequest(ExchangeChannel channel, Request req) throws RemotingException {
        Response res = new Response(req.getId(), req.getVersion());
        Object data;
        if (req.isBroken()) {
            data = req.getData();
            String msg;
            if (data == null) {
                msg = null;
            } else if (data instanceof Throwable) {
                msg = StringUtils.toString((Throwable)data);
            } else {
                msg = data.toString();
            }

            res.setErrorMessage("Fail to decode request due to: " + msg);
            res.setStatus((byte)40);
            channel.send(res);
        } else {
            data = req.getData();

            try {
               //这会调用后向Handler的reply(匿名handler:DubboProtocol.requestHandler)
                CompletableFuture<Object> future = this.handler.reply(channel, data);
                if (future.isDone()) {
                    res.setStatus((byte)20);
                    res.setResult(future.get());
                    channel.send(res);
                    return;
                }

                future.whenComplete((result, t) -> {
                    try {
                        try {
                            if (t == null) {
                                res.setStatus((byte)20);
                                res.setResult(result);
                            } else {
                                res.setStatus((byte)70);
                                res.setErrorMessage(StringUtils.toString(t));
                            }
                             //通过channel发送响应结果
                            channel.send(res);
                        } catch (RemotingException var8) {
                            logger.warn("Send result to consumer failed, channel is " + channel + ", msg is " + var8);
                        }

                    } finally {
                        ;
                    }
                });
            } catch (Throwable var6) {
                res.setStatus((byte)70);
                res.setErrorMessage(StringUtils.toString(var6));
                channel.send(res);
            }

        }
    }
随后会调用RequetHandler.reply:
 private ExchangeHandler requestHandler = new ExchangeHandlerAdapter() {
        public CompletableFuture<Object> reply(ExchangeChannel channel, Object message) throws RemotingException {
            if (!(message instanceof Invocation)) {
                throw new RemotingException(channel, "Unsupported request: " + (message == null ? null : message.getClass().getName() + ": " + message) + ", channel: consumer: " + channel.getRemoteAddress() + " --> provider: " + channel.getLocalAddress());
            } else {
                Invocation inv = (Invocation)message;
                Invoker<?> invoker = DubboProtocol.this.getInvoker(channel, inv);
                boolean hasMethod;
                if (Boolean.TRUE.toString().equals(inv.getAttachments().get("_isCallBackServiceInvoke"))) {
                    String methodsStr = (String)invoker.getUrl().getParameters().get("methods");
                    hasMethod = false;
                    if (methodsStr != null && methodsStr.contains(",")) {
                        String[] methods = methodsStr.split(",");
                        String[] var8 = methods;
                        int var9 = methods.length;

                        for(int var10 = 0; var10 < var9; ++var10) {
                            String method = var8[var10];
                            if (inv.getMethodName().equals(method)) {
                                hasMethod = true;
                                break;
                            }
                        }
                    } else {
                        hasMethod = inv.getMethodName().equals(methodsStr);
                    }

                    if (!hasMethod) {
                        DubboProtocol.this.logger.warn(new IllegalStateException("The methodName " + inv.getMethodName() + " not found in callback service interface ,invoke will be ignored. please update the api interface. url is:" + invoker.getUrl()) + " ,invocation is :" + inv);
                        return null;
                    }
                }

                RpcContext rpcContext = RpcContext.getContext();
                hasMethod = invoker.getUrl().getMethodParameter(inv.getMethodName(), "async", false);
                if (hasMethod) {
                    CompletableFuture<Object> future = new CompletableFuture();
                    rpcContext.setAsyncContext(new AsyncContextImpl(future));
                }

                rpcContext.setRemoteAddress(channel.getRemoteAddress());
                Result result = invoker.invoke(inv);
                return result instanceof AsyncRpcResult ? ((AsyncRpcResult)result).getResultFuture().thenApply((r) -> {
                    return r;
                }) : CompletableFuture.completedFuture(result);
            }
        }
4、业务线程池封装好结果后,会返回响应结果。
  protected Result doInvoke(Invocation invocation) throws Throwable {
        RpcInvocation inv = (RpcInvocation)invocation;
        String methodName = RpcUtils.getMethodName(invocation);
        inv.setAttachment("path", this.getUrl().getPath());
        inv.setAttachment("version", this.version);
        ExchangeClient currentClient;
        if (this.clients.length == 1) {
            currentClient = this.clients[0];
        } else {
            currentClient = this.clients[this.index.getAndIncrement() % this.clients.length];
        }

        try {
            boolean isAsync = RpcUtils.isAsync(this.getUrl(), invocation);
            boolean isAsyncFuture = RpcUtils.isGeneratedFuture(inv) || RpcUtils.isFutureReturnType(inv);
            boolean isOneway = RpcUtils.isOneway(this.getUrl(), invocation);
            int timeout = this.getUrl().getMethodParameter(methodName, "timeout", 1000);
            int clientTimeout = Integer.parseInt(invocation.getAttachment("timeout", "-1"));
            if (clientTimeout > 0) {
                timeout = clientTimeout;
            }

            if (isOneway) {
                boolean isSent = this.getUrl().getMethodParameter(methodName, "sent", false);
                currentClient.send(inv, isSent);
                RpcContext.getContext().setFuture((Future)null);
                return new RpcResult();
            } else if (isAsync) {
                ResponseFuture future = currentClient.request(inv, timeout);
                FutureAdapter<Object> futureAdapter = new FutureAdapter(future);
                RpcContext.getContext().setFuture(futureAdapter);
                Object result;
                if (isAsyncFuture) {
                    result = new AsyncRpcResult(futureAdapter, futureAdapter.getResultFuture(), false);
                } else {
                    result = new SimpleAsyncRpcResult(futureAdapter, futureAdapter.getResultFuture(), false);
                }

                return (Result)result;
            } else {
                RpcContext.getContext().setFuture((Future)null);
                return (Result)currentClient.request(inv, timeout).get();
            }
        } catch (TimeoutException var13) {
            throw new RpcException(2, "Invoke remote method timeout. method: " + invocation.getMethodName() + ", provider: " + this.getUrl() + ", cause: " + var13.getMessage(), var13);
        } catch (RemotingException var14) {
            throw new RpcException(1, "Failed to invoke remote method: " + invocation.getMethodName() + ", provider: " + this.getUrl() + ", cause: " + var14.getMessage(), var14);
        }
    }
发送消息:
HeaderExchangeChannel#send =>
NettyChannel#send =>
NioSocketChannel#writeAndFlush(message)
5、随后IO线程接收到消息后,会执行HeaderExchangeHandler下个方法:
 static void handleResponse(Channel channel, Response response) throws RemotingException {
        if (response != null && !response.isHeartbeat()) {
            DefaultFuture.received(channel, response);
        }

    }
6、当响应对象到来后,用户线程会被唤醒,并通过 调用编号 获取属于自己的响应对象。通过DefaultFuture.get方法阻塞地获取响应结果。
public class DefaultFuture implements ResponseFuture {

    private final Lock lock = new ReentrantLock();
    private final Condition done = lock.newCondition();
    private volatile Response response;

	public static void received(Channel channel, Response response) {
        try {
            // 根据调用编号从 FUTURES 集合中查找指定的 DefaultFuture 对象
            DefaultFuture future = FUTURES.remove(response.getId());
            if (future != null) {
                // 继续向下调用
                future.doReceived(response);
            } else {
                logger.warn("The timeout response finally returned at ...");
            }
        } finally {
            CHANNELS.remove(response.getId());
        }
    }

	private void doReceived(Response res) {
        lock.lock();
        try {
            // 保存响应对象
            response = res;
            if (done != null) {
                // 唤醒用户线程
                done.signal();
            }
        } finally {
            lock.unlock();
        }
        if (callback != null) {
            invokeCallback(callback);
        }
    }
}
从上面的代码可以看到,用户线程通过Condition接口实现线程等待和唤醒。
当收到响应消息后,会通过signal方法唤醒用户线程。唤醒后线程执行读操作。
消费者不用担心接收别的响应消息,因为所有消息都是有全局唯一标识的。
不过还要说一点,这个DubboFuture的获取过程。直接从官网copy:DefaultFuture 被创建时,会要求传入一个 Request 对象。此时 DefaultFuture 可从 Request 对象中获取调用编号,并将 <调用编号, DefaultFuture 对象> 映射关系存入到静态 Map 中,即 FUTURES,这是一个ConcurrentHashMap
。线程池中的线程在收到 Response 对象后,会根据 Response 对象中的调用编号到 FUTURES 集合中取出相应的 DefaultFuture 对象,然后再将 Response 对象设置到 DefaultFuture 对象中。
看一下FUTURES.
public class DefaultFuture implements ResponseFuture {
   //DefaultFuture的MAP,Key是调用编号。
    private static final Map<Long, DefaultFuture> FUTURES = new ConcurrentHashMap();

    private final long id;
    private final Channel channel;
    private final Request request;
    private final int timeout;
    private final Lock lock = new ReentrantLock();
    private final Condition done;
    private final long start;
    private volatile long sent;
    private volatile Response response;
    private volatile ResponseCallback callback;

    private DefaultFuture(Channel channel, Request request, int timeout) {
        this.done = this.lock.newCondition();
        this.start = System.currentTimeMillis();
        this.channel = channel;
        this.request = request;
        this.id = request.getId();
        this.timeout = timeout > 0 ? timeout : channel.getUrl().getPositiveParameter("timeout", 1000);
        FUTURES.put(this.id, this);
        CHANNELS.put(this.id, channel);
    }
获取DefaultFuture:
 public static void received(Channel channel, Response response) {
        try {
            DefaultFuture future = (DefaultFuture)FUTURES.remove(response.getId());
            if (future != null) {
                future.doReceived(response);
            } else {
                logger.warn("The timeout response finally returned at " + (new SimpleDateFormat("yyyy-MM-dd HH:mm:ss.SSS")).format(new Date()) + (channel == null ? "" : ", channel: " + channel.getLocalAddress() + " -> " + channel.getRemoteAddress()));
            }
        } finally {
            CHANNELS.remove(response.getId());
        }

    }
参考:
Dubbo源码学习四(Consumer,Provider通信)
微信分享/微信扫码阅读