Redis数据结构
Redis使用了较丰富的数据结构,这也使得流行度已经完全超过了memcached,主要是有以下几种:
- 字符串;
- hash;
- 集合;
- 有序集合;
- 列表;
- bitmap;
- geo;
- stream;
- hyperloglog;
下面是我画的总结图:
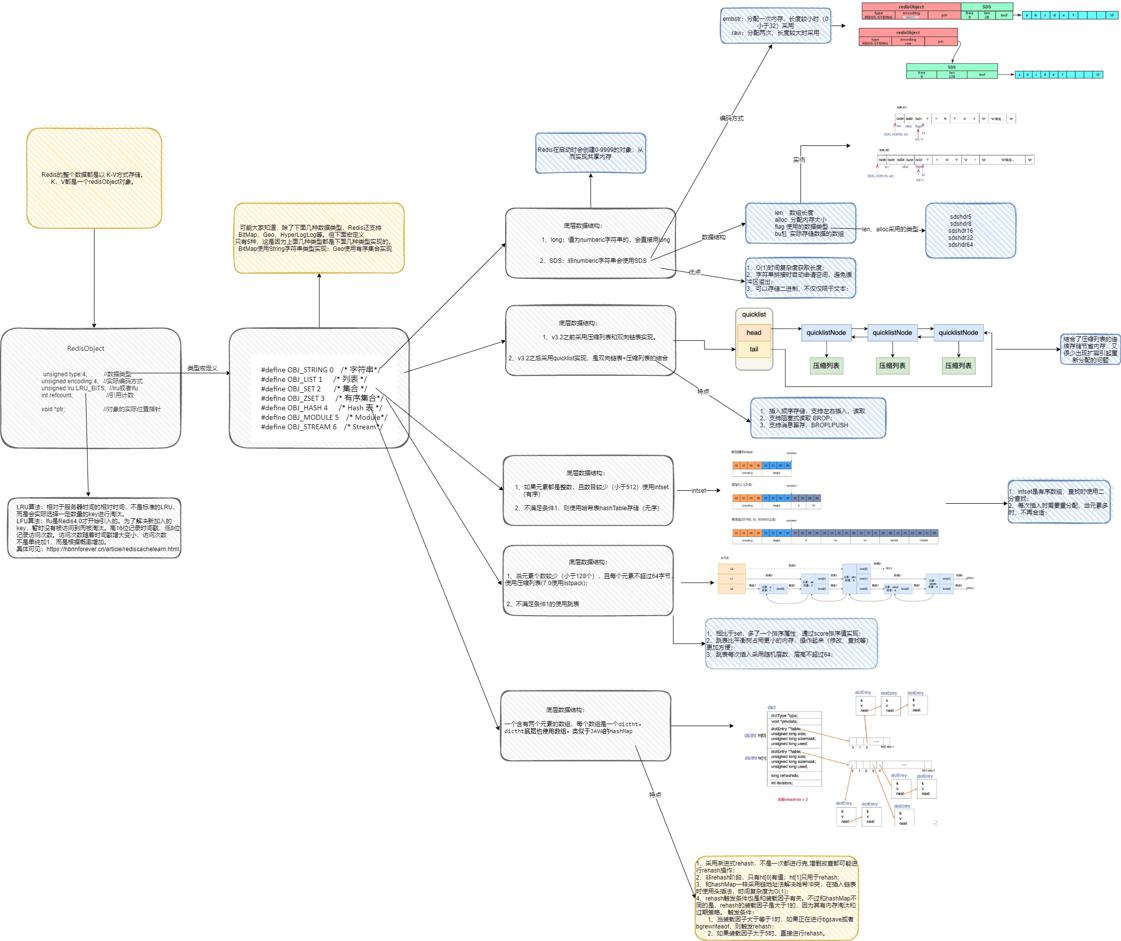
本身Redis是一个大dict,就是key->value的键值对。不管是key,还是value在Redis中,都是以Redis对象来存在的,看一下一个Redis对象的数据结构:
#define LRU_BITS 24
typedef struct redisObject {
    unsigned type:4;
    unsigned encoding:4;
    unsigned lru:LRU_BITS; /* lru time (relative to server.lruclock) */
    int refcount;
    void *ptr;
} robj;
可以看到这是一个struct结构体,type表示的是何种类型,类型主要包括:
#define OBJ_STRING 0    /* String object. */
#define OBJ_LIST 1      /* List object. */
#define OBJ_SET 2       /* Set object. */
#define OBJ_ZSET 3      /* Sorted set object. */
#define OBJ_HASH 4      /* Hash object. */
而下面的encoding就是具体以何种编码方式进行编码存储。比如对于一个string,如果是一个数值,就会以long的方式存储。非数值的可以以SDS或者embstr的方式存储。这样做的目的是Redis希望能找到更节省内存的方式存储。
主要的编码方式看以下宏定义:
#define OBJ_ENCODING_RAW 0     /* Raw representation */
#define OBJ_ENCODING_INT 1     /* Encoded as integer */
#define OBJ_ENCODING_HT 2      /* Encoded as hash table */
#define OBJ_ENCODING_ZIPMAP 3  /* Encoded as zipmap */
#define OBJ_ENCODING_LINKEDLIST 4 /* No longer used: old list encoding. */
#define OBJ_ENCODING_ZIPLIST 5 /* Encoded as ziplist */
#define OBJ_ENCODING_INTSET 6  /* Encoded as intset */
#define OBJ_ENCODING_SKIPLIST 7  /* Encoded as skiplist */
#define OBJ_ENCODING_EMBSTR 8  /* Embedded sds string encoding */
#define OBJ_ENCODING_QUICKLIST 9 /* Encoded as linked list of ziplists */
#define OBJ_ENCODING_STREAM 10 /* Encoded as a radix tree of listpacks */
lru这个之前已讨论过了,主要是用来做内存淘汰的。
ptr就是指向实际数据的void指针,可以是任意类型,sds,int,列表等等。
看到上面可以发现,不管是字符号,hash,列表还是集合,都有统一的一个结构,即RedisObject。
在对象里可以区分出是哪些类型,此外,encoding表示了不同的编码存储方式。这指出了里层的一个数据结构。具体的请见上面的宏定义。
下面是Redis字符串具体编码的一个过程,可以看一下:
robj *tryObjectEncoding(robj *o) {
    long value;
    sds s = o->ptr;
    size_t len;

    /* Make sure this is a string object, the only type we encode
     * in this function. Other types use encoded memory efficient
     * representations but are handled by the commands implementing
     * the type. */
    serverAssertWithInfo(NULL,o,o->type == OBJ_STRING);

    /* We try some specialized encoding only for objects that are
     * RAW or EMBSTR encoded, in other words objects that are still
     * in represented by an actually array of chars. */
    if (!sdsEncodedObject(o)) return o;

    /* It's not safe to encode shared objects: shared objects can be shared
     * everywhere in the "object space" of Redis and may end in places where
     * they are not handled. We handle them only as values in the keyspace. */
     if (o->refcount > 1) return o;

    /* Check if we can represent this string as a long integer.
     * Note that we are sure that a string larger than 20 chars is not
     * representable as a 32 nor 64 bit integer. */
    len = sdslen(s);
    if (len <= 20 && string2l(s,len,&value)) {
        /* This object is encodable as a long. Try to use a shared object.
         * Note that we avoid using shared integers when maxmemory is used
         * because every object needs to have a private LRU field for the LRU
         * algorithm to work well. */
        if ((server.maxmemory == 0 ||
            !(server.maxmemory_policy & MAXMEMORY_FLAG_NO_SHARED_INTEGERS)) &&
            value >= 0 &&
            value < OBJ_SHARED_INTEGERS)
        {
            decrRefCount(o);
            incrRefCount(shared.integers[value]);
            return shared.integers[value];
        } else {
            if (o->encoding == OBJ_ENCODING_RAW) {
                sdsfree(o->ptr);
                o->encoding = OBJ_ENCODING_INT;
                o->ptr = (void*) value;
                return o;
            } else if (o->encoding == OBJ_ENCODING_EMBSTR) {
                decrRefCount(o);
                return createStringObjectFromLongLongForValue(value);
            }
        }
    }

    /* If the string is small and is still RAW encoded,
     * try the EMBSTR encoding which is more efficient.
     * In this representation the object and the SDS string are allocated
     * in the same chunk of memory to save space and cache misses. */
    if (len <= OBJ_ENCODING_EMBSTR_SIZE_LIMIT) {
        robj *emb;

        if (o->encoding == OBJ_ENCODING_EMBSTR) return o;
        emb = createEmbeddedStringObject(s,sdslen(s));
        decrRefCount(o);
        return emb;
    }

    /* We can't encode the object...
     *
     * Do the last try, and at least optimize the SDS string inside
     * the string object to require little space, in case there
     * is more than 10% of free space at the end of the SDS string.
     *
     * We do that only for relatively large strings as this branch
     * is only entered if the length of the string is greater than
     * OBJ_ENCODING_EMBSTR_SIZE_LIMIT. */
    trimStringObjectIfNeeded(o);

    /* Return the original object. */
    return o;
}
简单的流程就是先检查时不是sds结构,如果不是直接返回,如果引用计数大于1也返回,如果一个字符串是数值类型,那么先判断设没设置内存大小,如果没有设置,可以使用共享内存。如果设置了,就不可使用了,因为设置内存需要进行内存淘汰,每个对象都有自己的lru值。
字符串
字符串并不是简单的使用C语言字符串,而是使用了SDS的结构,全称Simple Dynamic String。先看下SDS到底是什么样的结构。
它主要由header+字符串+填充字符(字符串长度小于最大容量时)+"\0"
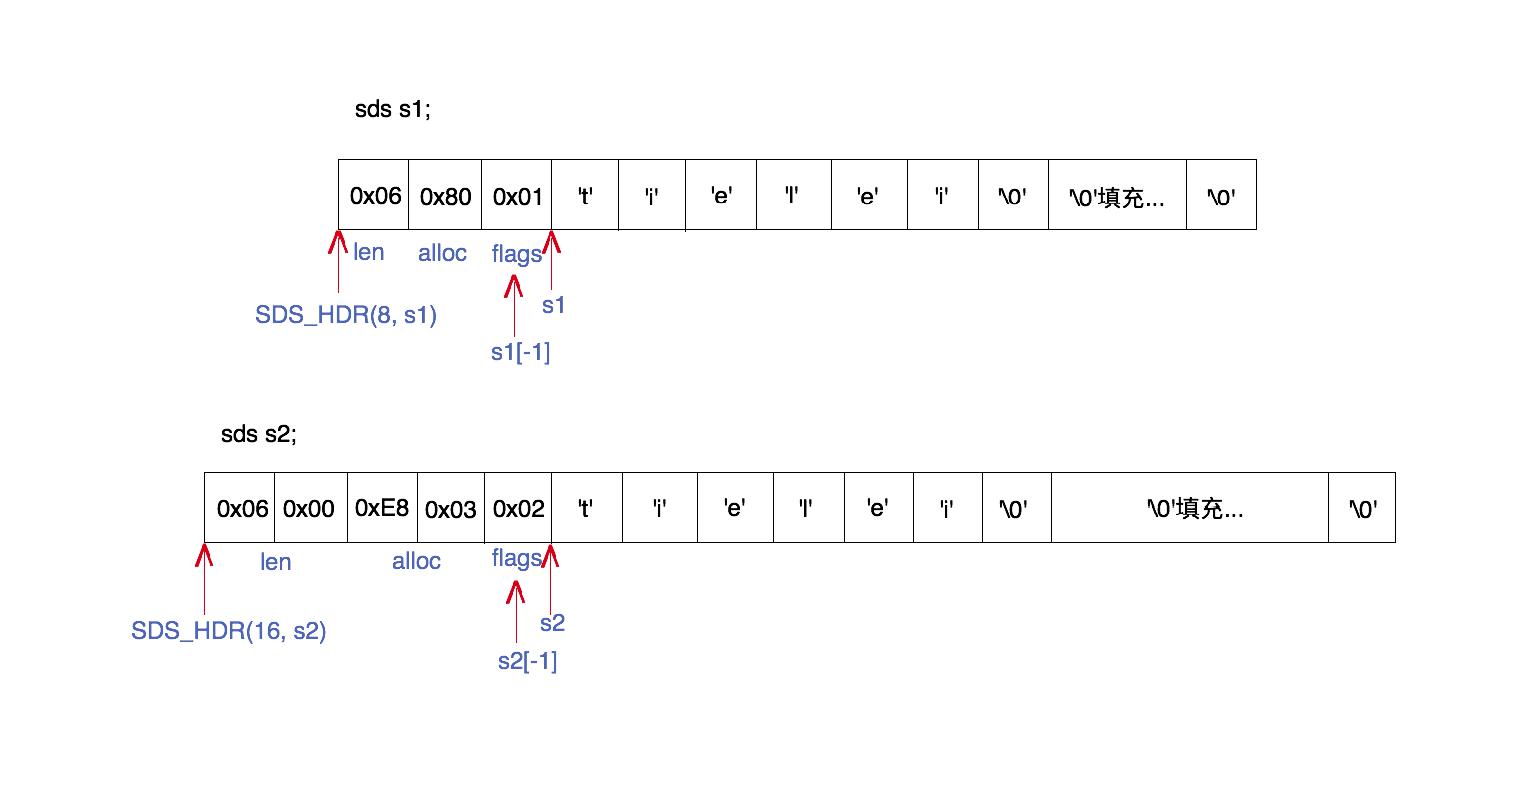
这个header是个struct类型,紧邻SDS字符串,在字符串的低位置。之所以这样是使得通过字符串指针为只可以轻松获取到header,header存储了当前字符串长度,最大容量以及flags标志位,这个flag表示的是这个header具体使用的是哪种类型,header类型包括:
#define SDS_TYPE_5  0
#define SDS_TYPE_8  1
#define SDS_TYPE_16 2
#define SDS_TYPE_32 3
#define SDS_TYPE_64 4
不同类型表示的用多少字节长度来表示,上面的图形很清晰
struct __attribute__ ((__packed__)) sdshdr8 {
    uint8_t len; /* used */
    uint8_t alloc; /* excluding the header and null terminator */
    unsigned char flags; /* 3 lsb of type, 5 unused bits */
    char buf[];
};
struct __attribute__ ((__packed__)) sdshdr16 {
    uint16_t len; /* used */
    uint16_t alloc; /* excluding the header and null terminator */
    unsigned char flags; /* 3 lsb of type, 5 unused bits */
    char buf[];
};
struct __attribute__ ((__packed__)) sdshdr32 {
    uint32_t len; /* used */
    uint32_t alloc; /* excluding the header and null terminator */
    unsigned char flags; /* 3 lsb of type, 5 unused bits */
    char buf[];
};
struct __attribute__ ((__packed__)) sdshdr64 {
    uint64_t len; /* used */
    uint64_t alloc; /* excluding the header and null terminator */
    unsigned char flags; /* 3 lsb of type, 5 unused bits */
    char buf[];
};
Redis使用这种数据结构来存储字符串的好处都有啥啊?
首先是它使用header存储字符串长度,那么在获取字符串长度的时间复杂度是O(1),而C语言字符串的时间复杂度就是O(N)。那么对于一个给定的SDS字符串,怎么找到header呢?因为header和字符串数组是紧邻着的,header在低位置。所以根据字符串指针可以得到header。看看下面源码:
static inline size_t sdslen(const sds s) {
    unsigned char flags = s[-1];
    switch(flags&SDS_TYPE_MASK) {
        case SDS_TYPE_5:
            return SDS_TYPE_5_LEN(flags);
        case SDS_TYPE_8:
            return SDS_HDR(8,s)->len;
        case SDS_TYPE_16:
            return SDS_HDR(16,s)->len;
        case SDS_TYPE_32:
            return SDS_HDR(32,s)->len;
        case SDS_TYPE_64:
            return SDS_HDR(64,s)->len;
    }
    return 0;
}
flags位置是 s[-1],而这个SDS_HDR就表示header的地址指针。
#define SDS_HDR(T,s) ((struct sdshdr##T *)((s)-(sizeof(struct sdshdr##T))))
其次,因为SDS会预留一部分空间,所以当进行字符串拼接时,如果空间够就直接用,如果不够,再重新分配内存,所以这在一定程度上可以减少内存空间的分配。此外,当内存空间不足时,会自动分配内存,所以也不会出现空间溢出的问题。
字典
字典在Redis应用颇多,主要是为了提高增删改查效率。本身key value这个就是一个大dict,此外,hash结构中,多个field value 也是字典结构。
看下字典结构的定义:
typedef struct dictht {
    dictEntry **table;
    unsigned long size;
    unsigned long sizemask;
    unsigned long used;
} dictht;

typedef struct dict {
    dictType *type;
    void *privdata;
    dictht ht[2];
    long rehashidx; /* rehashing not in progress if rehashidx == -1 */
    unsigned long iterators; /* number of iterators currently running */
} dict;
一个字典里会有两个dictht,之所以有俩是用于rehash,当未进行rehash时,只有ht[0]是有效的,ht[1]没有数据。每个dictht的数据存储采用哈希表的形式。当出现地址冲突的时候,采用链式法解决,这点和HashMap比较相似,在冲突元素较少时,hashMap会使用链表解决冲突,只是多时会使用红黑树。
此外,进行重hash的方式两者也有不同,Redis采用的是渐进式hash,即重hash不是一次完成的,而是每次只做部分操作,即将整个hash操作分散到各个查询插入修改的操作中。Redis主要考虑的还是性能。
哈希表中的每个元素都是一个dictEntry:
typedef struct dictEntry {
    void *key;
    union {
        void *val;
        uint64_t u64;
        int64_t s64;
        double d;
    } v;
    struct dictEntry *next;
} dictEntry;
下面是下面参考资料里的一个示意图,很清晰表明字典的结构:

看一下数据查找的一个过程:
dictEntry *dictFind(dict *d, const void *key)
{
    dictEntry *he;
    uint64_t h, idx, table;

    if (dictSize(d) == 0) return NULL; /* dict is empty */
    if (dictIsRehashing(d)) _dictRehashStep(d);
    h = dictHashKey(d, key);
    for (table = 0; table <= 1; table++) {
        idx = h & d->ht[table].sizemask;
        he = d->ht[table].table[idx];
        while(he) {
            if (key==he->key || dictCompareKeys(d, key, he->key))
                return he;
            he = he->next;
        }
        if (!dictIsRehashing(d)) return NULL;
    }
    return NULL;
}
其实很简单,如果正在rehash操作,要等待该步骤完成。然后根据目标key获取hash值。然后分别在两张哈希表中进行寻找。找到对应表中的位置,然后进行链表遍历,找到对应元素。
再看一下创建过程,就是初始化各个变量以及两个哈希表。rehashidx初始值是-1:
dict *dictCreate(dictType *type,
        void *privDataPtr)
{
    dict *d = zmalloc(sizeof(*d));

    _dictInit(d,type,privDataPtr);
    return d;
}

/* Initialize the hash table */
int _dictInit(dict *d, dictType *type,
        void *privDataPtr)
{
    _dictReset(&d->ht[0]);
    _dictReset(&d->ht[1]);
    d->type = type;
    d->privdata = privDataPtr;
    d->rehashidx = -1;
    d->iterators = 0;
    return DICT_OK;
}


static void _dictReset(dictht *ht)
{
    ht->table = NULL;
    ht->size = 0;
    ht->sizemask = 0;
    ht->used = 0;
}
接着看插入操作:
/* Add an element to the target hash table */
int dictAdd(dict *d, void *key, void *val)
{
    dictEntry *entry = dictAddRaw(d,key,NULL);

    if (!entry) return DICT_ERR;
    dictSetVal(d, entry, val);
    return DICT_OK;
}

dictEntry *dictAddRaw(dict *d, void *key, dictEntry **existing)
{
    long index;
    dictEntry *entry;
    dictht *ht;

    if (dictIsRehashing(d)) _dictRehashStep(d);

    /* Get the index of the new element, or -1 if
     * the element already exists. */
    if ((index = _dictKeyIndex(d, key, dictHashKey(d,key), existing)) == -1)
        return NULL;

    /* Allocate the memory and store the new entry.
     * Insert the element in top, with the assumption that in a database
     * system it is more likely that recently added entries are accessed
     * more frequently. */
    ht = dictIsRehashing(d) ? &d->ht[1] : &d->ht[0];
    entry = zmalloc(sizeof(*entry));
    entry->next = ht->table[index];
    ht->table[index] = entry;
    ht->used++;

    /* Set the hash entry fields. */
    dictSetKey(d, entry, key);
    return entry;
}
插入的简单流程就是:首先也是看是否正在rehash,如果是,就执行一次rehash操作。检查目标key是否已经存在,如果存在就返回。随后,如果是正在rehash,就直接插入到ht[1],第二张哈希表中。
找到目的索引位置后,如果是有冲突元素,即链表,则插入到链表头,原因就在于最新插入的可能越有可能被访问,此外,不必在遍历到链表,时间复杂度是O(N)。
随后设置dictEntry的key和value值。
看完了上面的创建,插入,查找等过程之后,删除就非常简单了。
static dictEntry *dictGenericDelete(dict *d, const void *key, int nofree) {
    uint64_t h, idx;
    dictEntry *he, *prevHe;
    int table;

    if (d->ht[0].used == 0 && d->ht[1].used == 0) return NULL;

    if (dictIsRehashing(d)) _dictRehashStep(d);
    h = dictHashKey(d, key);

    for (table = 0; table <= 1; table++) {
        idx = h & d->ht[table].sizemask;
        he = d->ht[table].table[idx];
        prevHe = NULL;
        while(he) {
            if (key==he->key || dictCompareKeys(d, key, he->key)) {
                /* Unlink the element from the list */
                if (prevHe)
                    prevHe->next = he->next;
                else
                    d->ht[table].table[idx] = he->next;
                if (!nofree) {
                    dictFreeKey(d, he);
                    dictFreeVal(d, he);
                    zfree(he);
                }
                d->ht[table].used--;
                return he;
            }
            prevHe = he;
            he = he->next;
        }
        if (!dictIsRehashing(d)) break;
    }
    return NULL; /* not found */
}
删除的一个简单流程:首先同样判断是否进行rehash,有就执行一次rehash操作。然后分别遍历两张哈希表。根据hashkey找到目标位置,然后开始遍历链表,找到了直接删除,这个地方其实就是链表的操作了。
说完了Redis字典的增删改查,可以看到每一个步骤当中都有rehash的判断和执行过程。
这个rehash操作在Redis中还是比较重要的,看一下其实现原理:
int dictRehash(dict *d, int n) {
    //rehashidx最多连续移动 10倍的长度,
    int empty_visits = n*10; /* Max number of empty buckets to visit. */
    if (!dictIsRehashing(d)) return 0;

   //循环遍历ht[0],执行n步骤,且不为空,
    while(n-- && d->ht[0].used != 0) {
        dictEntry *de, *nextde;

        /* Note that rehashidx can't overflow as we are sure there are more
         * elements because ht[0].used != 0 */
        assert(d->ht[0].size > (unsigned long)d->rehashidx);
        //直到获取第一个rehash值不为空
        while(d->ht[0].table[d->rehashidx] == NULL) {
            d->rehashidx++;
            if (--empty_visits == 0) return 1;
        }
        //获取到对应的dictEntry
        de = d->ht[0].table[d->rehashidx];
        /* Move all the keys in this bucket from the old to the new hash HT */
        //这一个bucket就是一个链表,在同一个索引位置上的元素,一次rehash步骤会一起移过去。
        while(de) {
            uint64_t h;

            nextde = de->next;
            /* Get the index in the new hash table */
            h = dictHashKey(d, de->key) & d->ht[1].sizemask;
            de->next = d->ht[1].table[h];
            d->ht[1].table[h] = de;
            d->ht[0].used--;
            d->ht[1].used++;
            de = nextde;
        }
        d->ht[0].table[d->rehashidx] = NULL;
        d->rehashidx++;
    }

    /* Check if we already rehashed the whole table... */
    if (d->ht[0].used == 0) {
        zfree(d->ht[0].table);
        d->ht[0] = d->ht[1];
        _dictReset(&d->ht[1]);
        d->rehashidx = -1;
        return 0;
    }

    /* More to rehash... */
    return 1;
}
说了rehash的过程,那什么时候进行rehash呢?我们知道HashMap中定义了装载因子是0.75(元素个数/总容量),装载因子设置过大,就非常有可能因日冲突,导致单个索引下出现链表或者红黑数结构,不利于查找;装载因子过小,可能会造成空间的浪费。
然而Redis的装载因子设置为1,此外在判断是不是需要rehash的规则是:
1、服务器目前没有在执行 BGSAVE/BGREWRITEAOF 命令, 并且哈希表的负载因子大于等于 1;
2、服务器目前正在执行 BGSAVE/BGREWRITEAOF 命令, 并且哈希表的负载因子大于等于 5;
源码:
/* Expand the hash table if needed */
static int _dictExpandIfNeeded(dict *d)
{
    /* Incremental rehashing already in progress. Return. */
    // 如果正在进行渐进式扩容,则返回OK
    if (dictIsRehashing(d)) return DICT_OK;

    /* If the hash table is empty expand it to the initial size. */
    // 如果哈希表ht[0]的大小为0,则初始化字典
    if (d->ht[0].size == 0) return dictExpand(d, DICT_HT_INITIAL_SIZE);

    /* If we reached the 1:1 ratio, and we are allowed to resize the hash
     * table (global setting) or we should avoid it but the ratio between
     * elements/buckets is over the "safe" threshold, we resize doubling
     * the number of buckets. */
    /*
     * 如果哈希表ht[0]中保存的key个数与哈希表大小的比例已经达到1:1,即保存的节点数已经大于哈希表大小
     * 且redis服务当前允许执行rehash,或者保存的节点数与哈希表大小的比例超过了安全阈值(默认值为5)
     * 则将哈希表大小扩容为原来的两倍
     */
    if (d->ht[0].used >= d->ht[0].size &&
        (dict_can_resize ||
         d->ht[0].used/d->ht[0].size > dict_force_resize_ratio))
    {
        return dictExpand(d, d->ht[0].used*2);
    }
    return DICT_OK;
}
之所以设置大于等于1,首先是Redis不希望经常进行rehash操作,因为rehash本身也是耗时的,此外Redis有过期淘汰策略,会惰性或者定时删除一些key,没必要总是执行rehash操作。
有扩容就会有缩容,当key和容量比例小于10%的时候,就会进行缩容。
压缩列表
在Redis的列表和较短字符串和较少元素的Hash中都使用了压缩列表。主要目的就是为了节省内存。
它类似一个双向链表,又不是双向链表。它是在内存中连续分配的空间,就是一个list。其结构比较特殊:
* <zlbytes> <zltail> <zllen> <entry> <entry> ... <entry> <zlend>
zlbyte表示的是总的字节数;
zltail表示起始位置到最后位置的偏移字节数;
zllen表示的是entry的个数;
zlend就是一个标记位。
entry就是真正的数据了。它的结构如下:
<prevrawlen><len><data>
prerawlen记录的是前一个entry所占的总字节数,len表示的实际数据的长度,data就是真正的数据了。
通过Prerawlen可以很轻松的实现从后向前的遍历过程。
通过上面的结构可以以O(1)的时间复杂度进行Push和pop操作。具体的就不说了,太特么复杂了,不再花时间和精力去研究它了。
现在说一下Hash结构使用zipList的过程。当我们创建hash时,会创建如下对象:
robj *createHashObject(void) {
    unsigned char *zl = ziplistNew();
    robj *o = createObject(OBJ_HASH, zl);
    o->encoding = OBJ_ENCODING_ZIPLIST;
    return o;
}
当数据较多或者filed的value超过一定长度时,都会使用dict结构。之所以这样是因为数据过多时性能降低,因为其查找需要遍历。此外内存拷贝的成本也比较大。
在成员较少的情况下,hash,有序集合都会使用ziplist。在Redis3.2之前,列表在元素较少时直接使用ziplist。后来就都用了quicklist结构了。
什么场景下使用ziplist,可以通过配置控制:
hash-max-ziplist-entries 512
hash-max-ziplist-value 64
zset-max-ziplist-entries 128
zset-max-ziplist-value 64
quicklist
列表内部编码方式采用的就是quicklist结构。这个从大面来讲是一个双向链表,但又不是简单的双向链表。说他是双向链表使用因为有着双向链表基本的特性,可以向前后向后遍历,添加和删除的时间复杂度都是O(1)。说他不是简单的双向链表,是因为元素并不是普通的元素,而是由多个zipList组成,即都是由压缩表构成。
quicklist是双向链表和ziplist的两者结合,肯定是要使用两者的优点。双向链表的优点就是上面所说的,缺点就是容易导致内存碎片;ziplist在元素多的时候内存拷贝成本大,优点就是内存地址是连续的。
但如何掌握ziplist和双向链表的平衡点是重中之重。
看一下quicklist的提醒:
/* quicklist is a 40 byte struct (on 64-bit systems) describing a quicklist.
 * 'count' is the number of total entries.
 * 'len' is the number of quicklist nodes.
 * 'compress' is: 0 if compression disabled, otherwise it's the number
 *                of quicklistNodes to leave uncompressed at ends of quicklist.
 * 'fill' is the user-requested (or default) fill factor.
 * 'bookmakrs are an optional feature that is used by realloc this struct,
 *      so that they don't consume memory when not used. */
typedef struct quicklist {
    quicklistNode *head;
    quicklistNode *tail;
    unsigned long count;        /* total count of all entries in all ziplists */
    unsigned long len;          /* number of quicklistNodes */
    int fill : QL_FILL_BITS;              /* fill factor for individual nodes */
    unsigned int compress : QL_COMP_BITS; /* depth of end nodes not to compress;0=off */
    unsigned int bookmark_count: QL_BM_BITS;
    quicklistBookmark bookmarks[];
} quicklist;
他定义了首尾指针,以及所有ziplist的entry总数等等。
每一个quicklist节点定义:
/* quicklistNode is a 32 byte struct describing a ziplist for a quicklist.
 * We use bit fields keep the quicklistNode at 32 bytes.
 * count: 16 bits, max 65536 (max zl bytes is 65k, so max count actually < 32k).
 * encoding: 2 bits, RAW=1, LZF=2.
 * container: 2 bits, NONE=1, ZIPLIST=2.
 * recompress: 1 bit, bool, true if node is temporary decompressed for usage.
 * attempted_compress: 1 bit, boolean, used for verifying during testing.
 * extra: 10 bits, free for future use; pads out the remainder of 32 bits */
typedef struct quicklistNode {
    struct quicklistNode *prev;
    struct quicklistNode *next;
    unsigned char *zl;
    unsigned int sz;             /* ziplist size in bytes */
    unsigned int count : 16;     /* count of items in ziplist */
    unsigned int encoding : 2;   /* RAW==1 or LZF==2 */
    unsigned int container : 2;  /* NONE==1 or ZIPLIST==2 */
    unsigned int recompress : 1; /* was this node previous compressed? */
    unsigned int attempted_compress : 1; /* node can't compress; too small */
    unsigned int extra : 10; /* more bits to steal for future usage */
} quicklistNode;


/* quicklistLZF is a 4+N byte struct holding 'sz' followed by 'compressed'.
 * 'sz' is byte length of 'compressed' field.
 * 'compressed' is LZF data with total (compressed) length 'sz'
 * NOTE: uncompressed length is stored in quicklistNode->sz.
 * When quicklistNode->zl is compressed, node->zl points to a quicklistLZF */
typedef struct quicklistLZF {
    unsigned int sz; /* LZF size in bytes*/
    char compressed[];
} quicklistLZF;
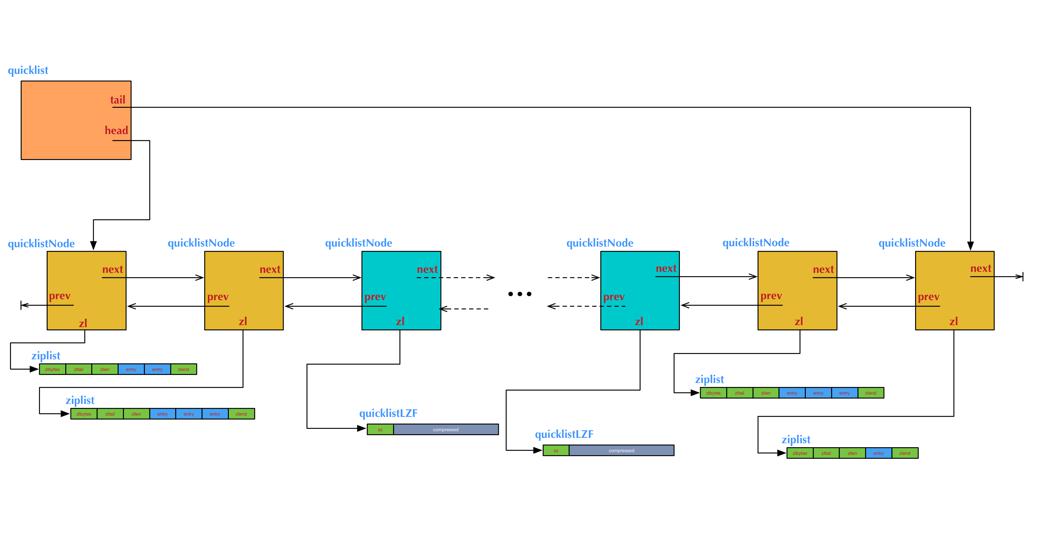
quicklistNode定义了前后指针,以及当前要指向的ziplist列表。当然,如果ziplist被压缩了,就指向压缩的数据quicklistLZF。
看到这儿,应该可以发现,quicklist还是比较复杂的,下面的一张图大体展示了该结构:
intset
当一个集合中的数据都是整数且较少的时候,就使用intset的数据结构。
当有非数字加入或者元素个数较多的时候,就会使用hashtable编码方式。
下面是一个简单的测试:
10.38.163.219:6379> smembers testset1
(empty list or set)
10.38.163.219:6379> sadd testset1 32 3 1 5
(integer) 4
10.38.163.219:6379> object encoding testset1
"intset"
10.38.163.219:6379> smembers testset1
1) "1"
2) "3"
3) "5"
4) "32"
10.38.163.219:6379> object encoding testset1
"intset"


10.38.163.219:6379> object encoding testset2
"hashtable"
10.38.163.219:6379> spop testset2
"hshs"
10.38.163.219:6379> smembers testset2
1) "1"
10.38.163.219:6379> object encoding testset2
"hashtable"
10.38.163.219:6379> object encoding testset2
"hashtable"
10.38.163.219:6379> object encoding testset2
"hashtable"
从上面的例子也可以看到,它采用intset的结构时,其实它是一个有序的数组,这样也方便使用二分查找。
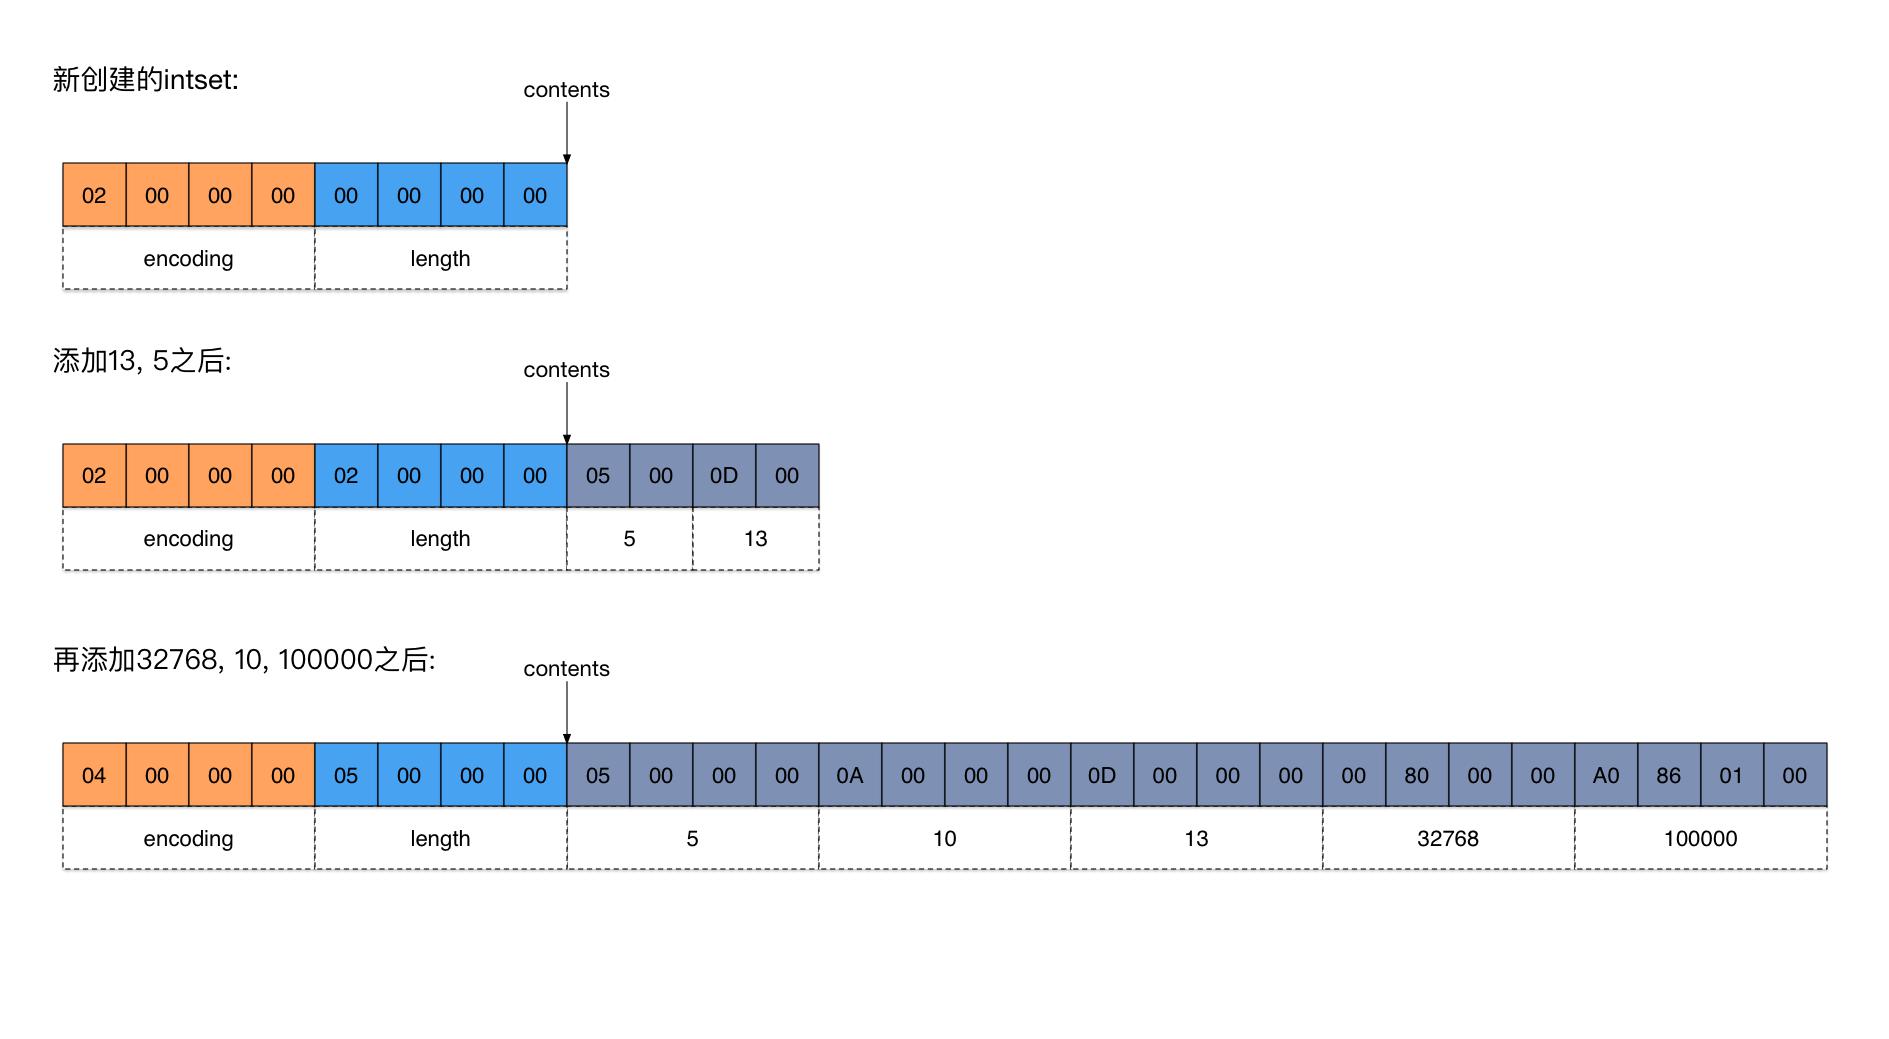
一个intset集合是由encoding+length+数据数组组成的。
encoding表示每个数据元素采用几个字节存储;
length表示数组的元素个数;
下面是一个intset数据例子(来自参考资料):
看一下它的查找过程:
static uint8_t intsetSearch(intset *is, int64_t value, uint32_t *pos) {
    int min = 0, max = intrev32ifbe(is->length)-1, mid = -1;
    int64_t cur = -1;

    /* The value can never be found when the set is empty */
    if (intrev32ifbe(is->length) == 0) {
        if (pos) *pos = 0;
        return 0;
    } else {
        /* Check for the case where we know we cannot find the value,
         * but do know the insert position. */
        if (value > _intsetGet(is,max)) {
            if (pos) *pos = intrev32ifbe(is->length);
            return 0;
        } else if (value < _intsetGet(is,0)) {
            if (pos) *pos = 0;
            return 0;
        }
    }

    while(max >= min) {
        mid = ((unsigned int)min + (unsigned int)max) >> 1;
        cur = _intsetGet(is,mid);
        if (value > cur) {
            min = mid+1;
        } else if (value < cur) {
            max = mid-1;
        } else {
            break;
        }
    }

    if (value == cur) {
        if (pos) *pos = mid;
        return 1;
    } else {
        if (pos) *pos = min;
        return 0;
    }
}
intset的查找过程就是一个标准的二分查找。
然后是插入过程:
intset *intsetAdd(intset *is, int64_t value, uint8_t *success) {
    uint8_t valenc = _intsetValueEncoding(value);
    uint32_t pos;
    if (success) *success = 1;

    /* Upgrade encoding if necessary. If we need to upgrade, we know that
     * this value should be either appended (if > 0) or prepended (if < 0),
     * because it lies outside the range of existing values. */
    if (valenc > intrev32ifbe(is->encoding)) {
        /* This always succeeds, so we don't need to curry *success. */
        return intsetUpgradeAndAdd(is,value);
    } else {
        /* Abort if the value is already present in the set.
         * This call will populate "pos" with the right position to insert
         * the value when it cannot be found. */
        if (intsetSearch(is,value,&pos)) {
            if (success) *success = 0;
            return is;
        }

        is = intsetResize(is,intrev32ifbe(is->length)+1);
        if (pos < intrev32ifbe(is->length)) intsetMoveTail(is,pos,pos+1);
    }

    _intsetSet(is,pos,value);
    is->length = intrev32ifbe(intrev32ifbe(is->length)+1);
    return is;
}
插入之前是要检查对应元素是否已经存在,存在就不再执行。不存在的话,首先realloac内存,然后插入到对应位置上。看到这应该明白,为什么元素多的时候不再适用,因为每添加一次都要进行内存重分配。
内存重分配后,会将待插入位置之后的元素统一向尾部移动。最后执行插入操作。
skiplist
Redis最后一种结构就是跳跃表了,主要是用来存储有序集合。有序集合当元素较少时,是直接使用ziplist,否则就会改用skiplist和dict结构。
skiplist我就不写了,我觉得这篇文章写的非常好: http://zhangtielei.com/posts/blog-redis-skiplist.html
skiplist是之前Pugh论文提出的,感兴趣可以看看。直接来一张论文里的跳表图:
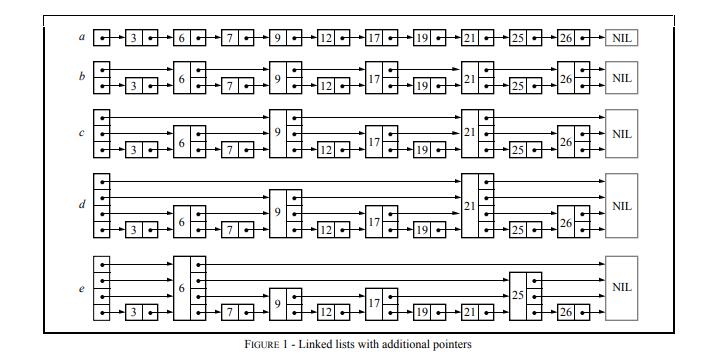
看下Redis的跳表数据结构:

把skiplist的数据结构放出来:
typedef struct zskiplistNode {
    sds ele;
    double score;
    struct zskiplistNode *backward;
    struct zskiplistLevel {
        struct zskiplistNode *forward;
        unsigned long span;
    } level[];
} zskiplistNode;

typedef struct zskiplist {
    struct zskiplistNode *header, *tail;
    unsigned long length;
    int level;
} zskiplist;
每一个节点都包含一个level数组,每个元素元素的是长度和指向的节点。
下面是完整的插入过程:
/* Insert a new node in the skiplist. Assumes the element does not already
 * exist (up to the caller to enforce that). The skiplist takes ownership
 * of the passed SDS string 'ele'. */
zskiplistNode *zslInsert(zskiplist *zsl, double score, sds ele) {
    zskiplistNode *update[ZSKIPLIST_MAXLEVEL], *x;
    unsigned int rank[ZSKIPLIST_MAXLEVEL];
    int i, level;

    serverAssert(!isnan(score));
    x = zsl->header;
    for (i = zsl->level-1; i >= 0; i--) {
        /* store rank that is crossed to reach the insert position */
        rank[i] = i == (zsl->level-1) ? 0 : rank[i+1];
        while (x->level[i].forward &&
                (x->level[i].forward->score < score ||
                    (x->level[i].forward->score == score &&
                    sdscmp(x->level[i].forward->ele,ele) < 0)))
        {
            rank[i] += x->level[i].span;
            x = x->level[i].forward;
        }
        update[i] = x;
    }
    /* we assume the element is not already inside, since we allow duplicated
     * scores, reinserting the same element should never happen since the
     * caller of zslInsert() should test in the hash table if the element is
     * already inside or not. */
    level = zslRandomLevel();
    if (level > zsl->level) {
        for (i = zsl->level; i < level; i++) {
            rank[i] = 0;
            update[i] = zsl->header;
            update[i]->level[i].span = zsl->length;
        }
        zsl->level = level;
    }
    x = zslCreateNode(level,score,ele);
    for (i = 0; i < level; i++) {
        x->level[i].forward = update[i]->level[i].forward;
        update[i]->level[i].forward = x;

        /* update span covered by update[i] as x is inserted here */
        x->level[i].span = update[i]->level[i].span - (rank[0] - rank[i]);
        update[i]->level[i].span = (rank[0] - rank[i]) + 1;
    }

    /* increment span for untouched levels */
    for (i = level; i < zsl->level; i++) {
        update[i]->level[i].span++;
    }

    x->backward = (update[0] == zsl->header) ? NULL : update[0];
    if (x->level[0].forward)
        x->level[0].forward->backward = x;
    else
        zsl->tail = x;
    zsl->length++;
    return x;
}
理想情况下,我们希望第一层是N个节点,第二层是N>>1个节点,第三层是N>>2个节点,此次类推,最多是log2n层。但是在实际使用中,很难做的。因此Redis其在插入过程中,新节点的层数的产生也是根据注明的Pugh的论文做的。设置p的概率是0.25,如果产生的0-1随机数小于0.25,就增加一层,直到大于0.25返回层数。
int zslRandomLevel(void) {
    int level = 1;
    while ((random()&0xFFFF) < (ZSKIPLIST_P * 0xFFFF))
        level += 1;
    return (level<ZSKIPLIST_MAXLEVEL) ? level : ZSKIPLIST_MAXLEVEL;
}
JAVA的实现方式:
        int rnd = ThreadLocalRandom.nextSecondarySeed();
        if ((rnd & 0x80000001) == 0) { // test highest and lowest bits
            int level = 1, max;
            while (((rnd >>>= 1) & 1) != 0)
                ++level;
如果将上面插入过程拆分一下,主要分了几大步骤:
- 首先要找到每一层元素应该插入的位置。存到update数组中。层数字段在zskiplist有字段;
- 随机产生待插入节点的层数;
- 如果产生的层数大于当前跳表的最大层数,那么之上的层数的待插入位置更新为header地址,即更新update数组。
- 开始执行插入过程。
- 更新span ,length等字段。
讲完了几种结构,每种数据类型采用的编码方式如下:
字符串:raw SDS,embstr SDS,整型;
hash: ziplist ,哈希表;
列表:quicklist;
集合:intset,哈希表;
有序集合:ziplist,skiplist。
下面是书上的一个完整编码汇总:
REDIS_STRING
|
REDIS_ENCODING_INT
|
使用整数值实现的字符串对象。 |
REDIS_STRING
|
REDIS_ENCODING_EMBSTR
|
使用
embstr
编码的简单动态字符串实现的字符串对象。
|
REDIS_STRING
|
REDIS_ENCODING_RAW
|
使用简单动态字符串实现的字符串对象。 |
REDIS_LIST
|
REDIS_ENCODING_ZIPLIST
|
使用压缩列表实现的列表对象。 |
REDIS_LIST
|
REDIS_ENCODING_LINKEDLIST
|
使用双端链表实现的列表对象。 |
REDIS_HASH
|
REDIS_ENCODING_ZIPLIST
|
使用压缩列表实现的哈希对象。 |
REDIS_HASH
|
REDIS_ENCODING_HT
|
使用字典实现的哈希对象。 |
REDIS_SET
|
REDIS_ENCODING_INTSET
|
使用整数集合实现的集合对象。 |
REDIS_SET
|
REDIS_ENCODING_HT
|
使用字典实现的集合对象。 |
REDIS_ZSET
|
REDIS_ENCODING_ZIPLIST
|
使用压缩列表实现的有序集合对象。 |
REDIS_ZSET
|
REDIS_ENCODING_SKIPLIST
|
使用跳跃表和字典实现的有序集合对象。 |
不同的数据对象类型,甚至统一对象类型不同的场景下,可以使用不同的编码格式,Redis尽最大所能去节省内存,提升性能。非常牛鼻!!!
除了上面的各种类型对象和编码,Redis还有一个重要的概念就是共享对象。Redis为了节约内存,弄了一个范围在 0-9999的整形内存池,以供各个对象实现共享,从而减少内存的分配。
参考资料:
微信分享/微信扫码阅读


