JAVA代理及Dubbo与springboot的应用
代理模式在编程中是比较常用的一种模式,其简单介绍在我的很早一篇文章有写过,具体可看: 设计模式之代理模式 。本文主要学习代理在Java中的应用。
一、Java代理
在Java种,主要有静态代理,JDK动态代理和cglib代理。
1、静态代理
所谓静态,是因为其在编译过程中、运行前会生成实际的代理class文件,其对应关系不会在运行过程中改变。静态代理就要求代理对象实现和目标对象同样的接口。
看一下例子:
首先定义一个接口:
/**
 * 接口
 */
public interface Player {

    public String speak(String str);
}
一个实现类:
public class Yaoming implements Player {

    @Override
    public String speak(String str) {
        return String.format("hello,I'm yaoming ,you are %s",str);
    }
}
代理类:
/**
 * 要继承被代理对象的接口
 */
public class PlayerProxy implements Player {

    /**
     * 目标对象
     */
    private Player playerObj;


    public PlayerProxy(Player player){
        this.playerObj = player;
    }

    @Override
    public String speak(String str) {
        System.out.println("hi,I am proxyer of player,so please talk with me");
        String msg = playerObj.speak(str);
        System.out.println("hi, we must record anything what the player said");
        return  msg;
    }
}
调用:
@Test
    public void testProxy(){
        Player player = new Yaoming();
        PlayerProxy playerProxy = new PlayerProxy(player);
        String msg = playerProxy.speak("hello");
        System.out.println(String.format("the msg from proxy is:%s",msg));
    }
从上面的例子可以看到,通过静态代理,使得对象的功能得到了增加,并且没有改变原有对象。
但静态代理的缺点就是如果需要增加一个接口,实现类,代理类等都需要改变,维护起来不是很方便。因此。
动态代理思想是在运行中生成代理对象字节码,并加载到JVM中,动态代理不需要实现对象接口,但是需要通过某种途经根据目标对象接口动态生成代理,并加载到虚拟机中。该怎么实现呢?
目前动态代理的生成方式是通过JDK动态代理(实现接口)和cglib(继承),还有javassit等。
2、JDK动态代理
JDK代理的实现主要依赖于两个类: java.lang.reflect Proxy 和 java.lang.reflect InvocationHandler
InvocationHandler只有一个方法:invoke.看一下接口定义:
public interface InvocationHandler {

    /**
     * Processes a method invocation on a proxy instance and returns
     * the result.  This method will be invoked on an invocation handler
     * when a method is invoked on a proxy instance that it is
     * associated with.
     *
     * @param   proxy the proxy instance that the method was invoked on
     *
     * @param   method the {@code Method} instance corresponding to
     * the interface method invoked on the proxy instance.  The declaring
     * class of the {@code Method} object will be the interface that
     * the method was declared in, which may be a superinterface of the
     * proxy interface that the proxy class inherits the method through.
     *
     * @param   args an array of objects containing the values of the
     * arguments passed in the method invocation on the proxy instance,
     * or {@code null} if interface method takes no arguments.
     * Arguments of primitive types are wrapped in instances of the
     * appropriate primitive wrapper class, such as
     * {@code java.lang.Integer} or {@code java.lang.Boolean}.
     *
     */
    public Object invoke(Object proxy, Method method, Object[] args)
        throws Throwable;
}
java.lang.reflect Proxy 主要是创建代理对象。官方定义其作用:
provides static methods for creating dynamic proxy classes and instances, and it is also the superclass of all dynamic proxy classes created by those methods.
该类重要的方法是newProxyInstance,看下源码:
  /**
     * Returns an instance of a proxy class for the specified interfaces
     * that dispatches method invocations to the specified invocation
     * handler.
     *
     * <p>{@code Proxy.newProxyInstance} throws
     * {@code IllegalArgumentException} for the same reasons that
     * {@code Proxy.getProxyClass} does.
     *
     * @param   loader the class loader to define the proxy class
     * @param   interfaces the list of interfaces for the proxy class
     *          to implement
     * @param   h the invocation handler to dispatch method invocations to
     * @return  a proxy instance with the specified invocation handler of a
     *          proxy class that is defined by the specified class loader
     *          and that implements the specified interfaces
     */
    @CallerSensitive
    public static Object newProxyInstance(ClassLoader loader,
                                          Class<?>[] interfaces,
                                          InvocationHandler h)
        throws IllegalArgumentException
    {
        Objects.requireNonNull(h);

        final Class<?>[] intfs = interfaces.clone();
        final SecurityManager sm = System.getSecurityManager();
        if (sm != null) {
            checkProxyAccess(Reflection.getCallerClass(), loader, intfs);
        }

        /*
         * Look up or generate the designated proxy class.
         */
        Class<?> cl = getProxyClass0(loader, intfs);

        /*
         * Invoke its constructor with the designated invocation handler.
         */
        try {
            if (sm != null) {
                checkNewProxyPermission(Reflection.getCallerClass(), cl);
            }

            final Constructor<?> cons = cl.getConstructor(constructorParams);
            final InvocationHandler ih = h;
            if (!Modifier.isPublic(cl.getModifiers())) {
                AccessController.doPrivileged(new PrivilegedAction<Void>() {
                    public Void run() {
                        cons.setAccessible(true);
                        return null;
                    }
                });
            }
            return cons.newInstance(new Object[]{h});
        } catch (IllegalAccessException|InstantiationException e) {
            throw new InternalError(e.toString(), e);
        } catch (InvocationTargetException e) {
            Throwable t = e.getCause();
            if (t instanceof RuntimeException) {
                throw (RuntimeException) t;
            } else {
                throw new InternalError(t.toString(), t);
            }
        } catch (NoSuchMethodException e) {
            throw new InternalError(e.toString(), e);
        }
    }
上面的方法就是根据指定的类加载器、一组接口、调用处理器动态生成代理类实例。
第一个参数就是指对应的类加载器ClassLoader,类加载器就是负责将字节码加载到虚拟机并定义类对象。官方定义:
第二个参数就是对应的所有接口类。即原目标对象实现的所有接口。
第三个参数就是定义的InvocationHandler。
看一下实现原理。
Class<?> cl = getProxyClass0(loader, intfs)就是根据加载器和接口寻找或者定义代理对象。
 private static Class<?> getProxyClass0(ClassLoader loader,
                                           Class<?>... interfaces) {
        if (interfaces.length > 65535) {
            throw new IllegalArgumentException("interface limit exceeded");
        }

        // If the proxy class defined by the given loader implementing
        // the given interfaces exists, this will simply return the cached copy;
        // otherwise, it will create the proxy class via the ProxyClassFactory
        return proxyClassCache.get(loader, interfaces);
}- 首先通过 classLoader 获取该classLoader下所有的代理类缓存map。
- 从该代理类缓存map中根据代理类所有实现的所有接口进行查找代理类。
- 如果都没有找到对应的代理类,则使用ProxyClassFactory.apply() 方法生成代理类。
apply方法代码还是很长的:
 private static final class ProxyClassFactory
        implements BiFunction<ClassLoader, Class<?>[], Class<?>>
    {
        // prefix for all proxy class names
        private static final String proxyClassNamePrefix = "$Proxy";

        // next number to use for generation of unique proxy class names
        private static final AtomicLong nextUniqueNumber = new AtomicLong();

        @Override
        public Class<?> apply(ClassLoader loader, Class<?>[] interfaces) {

            Map<Class<?>, Boolean> interfaceSet = new IdentityHashMap<>(interfaces.length);
            for (Class<?> intf : interfaces) {
                /*
                 * Verify that the class loader resolves the name of this
                 * interface to the same Class object.
                 */
                Class<?> interfaceClass = null;
                try {
                    interfaceClass = Class.forName(intf.getName(), false, loader);
                } catch (ClassNotFoundException e) {
                }
                if (interfaceClass != intf) {
                    throw new IllegalArgumentException(
                        intf + " is not visible from class loader");
                }
                /*
                 * Verify that the Class object actually represents an
                 * interface.
                 */
                if (!interfaceClass.isInterface()) {
                    throw new IllegalArgumentException(
                        interfaceClass.getName() + " is not an interface");
                }
                /*
                 * Verify that this interface is not a duplicate.
                 */
                if (interfaceSet.put(interfaceClass, Boolean.TRUE) != null) {
                    throw new IllegalArgumentException(
                        "repeated interface: " + interfaceClass.getName());
                }
            }

            String proxyPkg = null;     // package to define proxy class in
            int accessFlags = Modifier.PUBLIC | Modifier.FINAL;

            /*
             * Record the package of a non-public proxy interface so that the
             * proxy class will be defined in the same package.  Verify that
             * all non-public proxy interfaces are in the same package.
             */
            for (Class<?> intf : interfaces) {
                int flags = intf.getModifiers();
                if (!Modifier.isPublic(flags)) {
                    accessFlags = Modifier.FINAL;
                    String name = intf.getName();
                    int n = name.lastIndexOf('.');
                    String pkg = ((n == -1) ? "" : name.substring(0, n + 1));
                    if (proxyPkg == null) {
                        proxyPkg = pkg;
                    } else if (!pkg.equals(proxyPkg)) {
                        throw new IllegalArgumentException(
                            "non-public interfaces from different packages");
                    }
                }
            }

            if (proxyPkg == null) {
                // if no non-public proxy interfaces, use com.sun.proxy package
                proxyPkg = ReflectUtil.PROXY_PACKAGE + ".";
            }

            /*
             * Choose a name for the proxy class to generate.
             */
            long num = nextUniqueNumber.getAndIncrement();
            String proxyName = proxyPkg + proxyClassNamePrefix + num;

            /*
             * Generate the specified proxy class.
             */
            byte[] proxyClassFile = ProxyGenerator.generateProxyClass(
                proxyName, interfaces, accessFlags);
            try {
                return defineClass0(loader, proxyName,
                                    proxyClassFile, 0, proxyClassFile.length);
            } catch (ClassFormatError e) {
                /*
                 * A ClassFormatError here means that (barring bugs in the
                 * proxy class generation code) there was some other
                 * invalid aspect of the arguments supplied to the proxy
                 * class creation (such as virtual machine limitations
                 * exceeded).
                 */
                throw new IllegalArgumentException(e.toString());
            }
        }
    }
上面方法主要做的事情:
1、生成代理类包名和类名
    if (proxyPkg == null) {
                // if no non-public proxy interfaces, use com.sun.proxy package
                proxyPkg = ReflectUtil.PROXY_PACKAGE + ".";
            }

            /*
             * Choose a name for the proxy class to generate.
             */
            long num = nextUniqueNumber.getAndIncrement();
            String proxyName = proxyPkg + proxyClassNamePrefix + num;
2、动态生成代理类字节码
  byte[] proxyClassFile = ProxyGenerator.generateProxyClass(
                proxyName, interfaces, accessFlags);
3、通过classloader动态加载字节码,并生成动态代理类的class。
  try {
                return defineClass0(loader, proxyName,
                                    proxyClassFile, 0, proxyClassFile.length);
            } catch (ClassFormatError e) {
}
实战:
还是以上面的接口为例。首先是InvocationHandler的实现了,主要是对原有方法的封装。
public class JDKProxyHandler implements InvocationHandler {


    private Object targetObj;

    public JDKProxyHandler(Object targetObj){
        this.targetObj = targetObj;
    }


    @Override
    public Object invoke(Object proxy, Method method, Object[] args) throws Throwable {
        System.out.println("hi,I am jdk proxyer of player,so please talk with me");
        Object msg = method.invoke(this.targetObj,args);
        System.out.println("hi, we must record anything what the jdk player said");
        return  msg;
    }
}
接着是动态代理类的定义。
public class JDKProxy {

    private Object targetObject;

    public JDKProxy(Object targetObject){
        this.targetObject = targetObject;
    }

    public Player getProxy(){
        return (Player) Proxy.newProxyInstance(
                targetObject.getClass().getClassLoader(),
                targetObject.getClass().getInterfaces(),
                new JDKProxyHandler(this.targetObject)
                );
    }

}
调用:
  @Test
    public void testJDKProxy(){
        Player player = new Yaoming();
        Player proxy = new JDKProxy(player).getProxy();
        String msg = proxy.speak("hello");
        System.out.println(String.format("the msg from jdk proxy is:%s",msg));
        ProxyUtil.generateClassFile(player.getClass(),"PlayerJDKProxy");
    }
从上面的例子也可以看到,代理对象不需要再实现所有的接口方法了,只需要动态调用,简化了代码的维护。
我把动态生成的代理类保存了下来,看看反编译的class类:
public final class PlayerJDKProxy extends Proxy implements Player {
    private static Method m1;
    private static Method m2;
    private static Method m3;
    private static Method m0;

    public PlayerJDKProxy(InvocationHandler var1) throws  {
        super(var1);
    }


    public final String speak(String var1) throws  {
        try {
            return (String)super.h.invoke(this, m3, new Object[]{var1});
        } catch (RuntimeException | Error var3) {
            throw var3;
        } catch (Throwable var4) {
            throw new UndeclaredThrowableException(var4);
        }
    }


    static {
        try {
            m1 = Class.forName("java.lang.Object").getMethod("equals", Class.forName("java.lang.Object"));
            m2 = Class.forName("java.lang.Object").getMethod("toString");
            m3 = Class.forName("com.hnshop.hbnnshop.prac.proxy.Player").getMethod("speak", Class.forName("java.lang.String"));
            m0 = Class.forName("java.lang.Object").getMethod("hashCode");
        } catch (NoSuchMethodException var2) {
            throw new NoSuchMethodError(var2.getMessage());
        } catch (ClassNotFoundException var3) {
            throw new NoClassDefFoundError(var3.getMessage());
        }
    }
}
动态生成的代理类的一些特点:
1)包:如果所代理的接口都是 public 的,那么它将被定义在顶层包(即包路径为空),如果所代理的接口中有非 public 的接口(因为接口不能被定义为 protect 或 private,所以除 public 之外就是默认的 package 访问级别),那么它将被定义在该接口所在包(假设代理了 com.ibm.developerworks 包中的某非 public 接口 A,那么新生成的代理类所在的包就是 com.ibm.developerworks),这样设计的目的是为了最大程度的保证动态代理类不会因为包管理的问题而无法被成功定义并访问;
2)类修饰符:该代理类具有 final 和 public 修饰符,意味着它可以被所有的类访问,但是不能被再度继承;
3)类名:格式是“$ProxyN”,其中 N 是一个逐一递增的阿拉伯数字,代表 Proxy 类第 N 次生成的动态代理类,值得注意的一点是,并不是每次调用 Proxy 的静态方法创建动态代理类都会使得 N 值增加,原因是如果对同一组接口(包括接口排列的顺序相同)试图重复创建动态代理类,它会很聪明地返回先前已经创建好的代理类的类对象,而不会再尝试去创建一个全新的代理类,这样可以节省不必要的代码重复生成,提高了代理类的创建效率。
OK ,JDK动态代理的原理和使用都介绍完了。它很好地避免了静态代理的缺点,但其自身也具备一定的限制,即它必须定义接口才能代理,不定义接口就是不可以的,这就带来的一定的局限性。
而cglib就是为了解决这个问题的。
3、cglib代理
cglib是一个第三方库,再运行时动态生成一个子类对象,从而实现对原对象功能的扩展。
先看使用方法:
1、一个父类
public class Yaoming {

    public String speak(String str) {
        return String.format("hello,I'm yaoming ,you are %s",str);
    }
}
2、代理类定义
public class CgProxy implements MethodInterceptor {

    private Object targetObj;

    public CgProxy(Object targetObj){
        this.targetObj = targetObj;
    }

    @Override
    public Object intercept(Object o, Method method, Object[] objects, MethodProxy methodProxy) throws Throwable {
        System.out.println("hi,I am cglib proxyer of player,so please talk with me");
        Object msg = method.invoke(this.targetObj,objects);
        System.out.println("hi, we must record anything what the cglib player said");
        return  msg;
    }

    public Object getInstance(){
        Enhancer enhancer = new Enhancer();
        //设置回调接口对象
        enhancer.setCallback(this);
        //设置父类
        enhancer.setSuperclass(targetObj.getClass());
        return  enhancer.create();
    }

}
3、调用
public void testCGLibProxy(){
        Yaoming yaoming = new Yaoming();
        Yaoming proxy = (Yaoming) new CgProxy(yaoming).getInstance();
        String msg = proxy.speak("hello");
        System.out.println(String.format("the msg from cglib proxy is:%s",msg));

    }
CGLIb由于是继承子类,所以不能代理finanl修饰或者private方法。
CGLIB代理的原理就是通过字节码技术为代理类创建一个子类,并拦截其方法,从而实现动态代理。而其中字节码技术主要时采用字节码生成框架ASM,该框架是一个 Java 字节码操控框架。它能够以二进制形式修改已有类或者动态生成类。ASM 可以直接产生二进制 class 文件,也可以在类被加载入 Java 虚拟机之前动态改变类行为。ASM 从类文件中读入信息后,能够改变类行为,分析类信息,甚至能够根据用户要求生成新类。
说完了两种动态代理,其实两者的区别已经很明显了。再补充一点就是JDK动态代理是采用反射机制的思想。
具体区别可参考: JDK和CGLIB动态代理区别
3、javassit实现动态代理。
javassit是 一个开源的分析、编辑和创建 Java 字节码 的类库 。
可引入依赖:
  <dependency>
            <groupId>org.javassist</groupId>
            <artifactId>javassist</artifactId>
            <version>3.26.0-GA</version>
        </dependency>
在Dubbo中,默认的就是采用这种方法。下面会详细介绍。
二、Dubbo代理应用
先看一下Dubbo的架构设计:
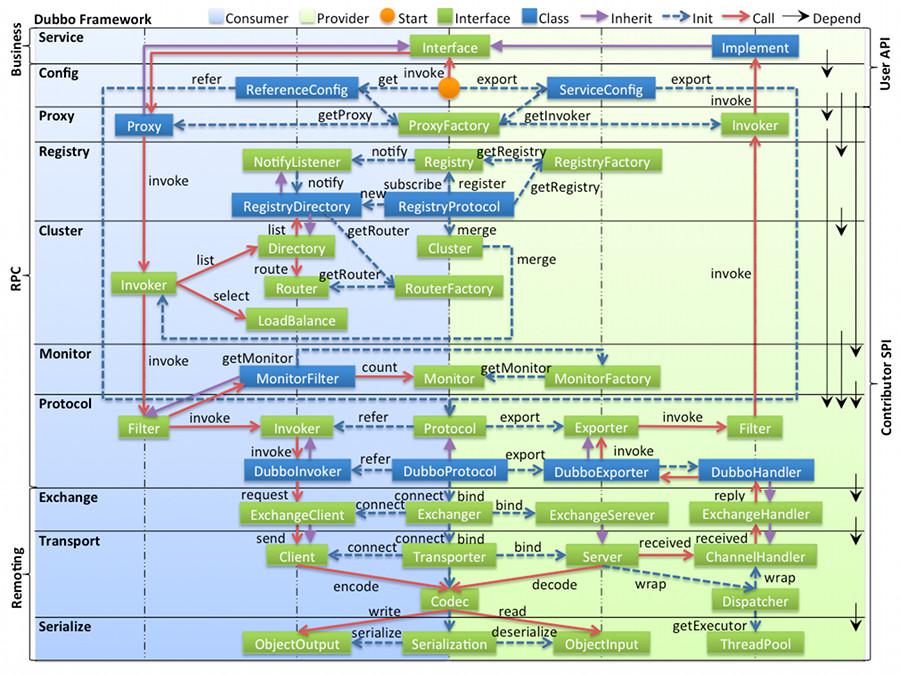
看上图有一层叫Proxy,官网给出的解释是:
proxy 服务代理层
:服务接口透明代理,生成服务的客户端 Stub 和服务器端 Skeleton, 以
ServiceProxy
为中心,扩展接口为
ProxyFactory。
可见,Dubbo的服务间的调用最上层都是通过代理完成的。那么在Dubbo中的动态代理方式是javassist和JDK.
首先看下SPI扩展:
stub=org.apache.dubbo.rpc.proxy.wrapper.StubProxyFactoryWrapper
jdk=org.apache.dubbo.rpc.proxy.jdk.JdkProxyFactory
javassist=org.apache.dubbo.rpc.proxy.javassist.JavassistProxyFactory
Dubbo共有三种代理方式,默认是javassit。
@SPI("javassist")
public interface ProxyFactory {
    @Adaptive({"proxy"})
    <T> T getProxy(Invoker<T> var1) throws RpcException;

    @Adaptive({"proxy"})
    <T> T getProxy(Invoker<T> var1, boolean var2) throws RpcException;

    @Adaptive({"proxy"})
    <T> Invoker<T> getInvoker(T var1, Class<T> var2, URL var3) throws RpcException;
}
getProxy是消费端用的,getInvoker是客户端用的。
先看客户端实现服务引用的过程。
我们知道Dubbo的spring扩展DubboNamespaceHandler加载了ReferenceBean.
public void init() {
        this.registerBeanDefinitionParser("application", new DubboBeanDefinitionParser(ApplicationConfig.class, true));
        this.registerBeanDefinitionParser("module", new DubboBeanDefinitionParser(ModuleConfig.class, true));
        this.registerBeanDefinitionParser("registry", new DubboBeanDefinitionParser(RegistryConfig.class, true));
        this.registerBeanDefinitionParser("monitor", new DubboBeanDefinitionParser(MonitorConfig.class, true));
        this.registerBeanDefinitionParser("provider", new DubboBeanDefinitionParser(ProviderConfig.class, true));
        this.registerBeanDefinitionParser("consumer", new DubboBeanDefinitionParser(ConsumerConfig.class, true));
        this.registerBeanDefinitionParser("protocol", new DubboBeanDefinitionParser(ProtocolConfig.class, true));
        this.registerBeanDefinitionParser("service", new DubboBeanDefinitionParser(ServiceBean.class, true));
        this.registerBeanDefinitionParser("reference", new DubboBeanDefinitionParser(ReferenceBean.class, false));
        this.registerBeanDefinitionParser("annotation", new AnnotationBeanDefinitionParser());
    }
ReferenceBean实现了下面几个接口:
public class ReferenceBean<T> extends ReferenceConfig<T> implements FactoryBean, ApplicationContextAware, InitializingBean, DisposableBean
该类实现了FactoryBean的getObject()方法,而这个方法就是用来创建Bean的。
该方法会调用内部的get方法:
 public synchronized T get() {
        if (this.destroyed) {
            throw new IllegalStateException("Already destroyed!");
        } else {
            if (this.ref == null) {
                this.init();
            }

            return this.ref;
        }
    }
上面的ref就是:
this.ref = this.createProxy(map);
也就是说getObject最终返回的是代理对象。
看一下这个方法源码:
 private T createProxy(Map<String, String> map) {
        URL tmpUrl = new URL("temp", "localhost", 0, map);
        boolean isJvmRefer;
        if (this.isInjvm() == null) {
            if (this.url != null && this.url.length() > 0) {
                isJvmRefer = false;
            } else {
                isJvmRefer = InjvmProtocol.getInjvmProtocol().isInjvmRefer(tmpUrl);
            }
        } else {
            isJvmRefer = this.isInjvm();
        }

        if (isJvmRefer) {
            URL url = (new URL("injvm", "127.0.0.1", 0, this.interfaceClass.getName())).addParameters(map);
            this.invoker = refprotocol.refer(this.interfaceClass, url);
            if (logger.isInfoEnabled()) {
                logger.info("Using injvm service " + this.interfaceClass.getName());
            }
        } else {
            URL u;
            URL url;
            if (this.url != null && this.url.length() > 0) {
                String[] us = Constants.SEMICOLON_SPLIT_PATTERN.split(this.url);
                if (us != null && us.length > 0) {
                    String[] var14 = us;
                    int var16 = us.length;

                    for(int var18 = 0; var18 < var16; ++var18) {
                        String u = var14[var18];
                        URL url = URL.valueOf(u);
                        if (url.getPath() == null || url.getPath().length() == 0) {
                            url = url.setPath(this.interfaceName);
                        }

                        if ("registry".equals(url.getProtocol())) {
                            this.urls.add(url.addParameterAndEncoded("refer", StringUtils.toQueryString(map)));
                        } else {
                            this.urls.add(ClusterUtils.mergeUrl(url, map));
                        }
                    }
                }
            } else {
                List<URL> us = this.loadRegistries(false);
                if (us != null && !us.isEmpty()) {
                    for(Iterator var5 = us.iterator(); var5.hasNext(); this.urls.add(u.addParameterAndEncoded("refer", StringUtils.toQueryString(map)))) {
                        u = (URL)var5.next();
                        url = this.loadMonitor(u);
                        if (url != null) {
                            map.put("monitor", URL.encode(url.toFullString()));
                        }
                    }
                }

                if (this.urls.isEmpty()) {
                    throw new IllegalStateException("No such any registry to reference " + this.interfaceName + " on the consumer " + NetUtils.getLocalHost() + " use dubbo version " + Version.getVersion() + ", please config <dubbo:registry address=\"...\" /> to your spring config.");
                }
            }

            if (this.urls.size() == 1) {
                this.invoker = refprotocol.refer(this.interfaceClass, (URL)this.urls.get(0));
            } else {
                List<Invoker<?>> invokers = new ArrayList();
                URL registryURL = null;
                Iterator var17 = this.urls.iterator();

                while(var17.hasNext()) {
                    url = (URL)var17.next();
                    invokers.add(refprotocol.refer(this.interfaceClass, url));
                    if ("registry".equals(url.getProtocol())) {
                        registryURL = url;
                    }
                }

                if (registryURL != null) {
                    u = registryURL.addParameter("cluster", "available");
                    this.invoker = cluster.join(new StaticDirectory(u, invokers));
                } else {
                    this.invoker = cluster.join(new StaticDirectory(invokers));
                }
            }
        }

        Boolean c = this.check;
        if (c == null && this.consumer != null) {
            c = this.consumer.isCheck();
        }

        if (c == null) {
            c = true;
        }

        if (c && !this.invoker.isAvailable()) {
            this.initialized = false;
            throw new IllegalStateException("Failed to check the status of the service " + this.interfaceName + ". No provider available for the service " + (this.group == null ? "" : this.group + "/") + this.interfaceName + (this.version == null ? "" : ":" + this.version) + " from the url " + this.invoker.getUrl() + " to the consumer " + NetUtils.getLocalHost() + " use dubbo version " + Version.getVersion());
        } else {
            if (logger.isInfoEnabled()) {
                logger.info("Refer dubbo service " + this.interfaceClass.getName() + " from url " + this.invoker.getUrl());
            }

            return proxyFactory.getProxy(this.invoker);
        }
    }
上面返回的是封装了invoker的代理对象。
上面的proxyFactory是通过SPI扩展获得的具体代理实现类。
proxyFactory是在ReferneceConfig初始化时得到的:
private static final ProxyFactory proxyFactory = (ProxyFactory)ExtensionLoader.getExtensionLoader(ProxyFactory.class).getAdaptiveExtension();
上面最终会调用实现类的getProxy.
实现类:
JavassistProxyFactory
JdkProxyFactory
看一下JavassistProxyFactory源码:
import org.apache.dubbo.common.URL;
import org.apache.dubbo.common.bytecode.Proxy;
import org.apache.dubbo.common.bytecode.Wrapper;
import org.apache.dubbo.rpc.Invoker;
import org.apache.dubbo.rpc.proxy.AbstractProxyFactory;
import org.apache.dubbo.rpc.proxy.AbstractProxyInvoker;
import org.apache.dubbo.rpc.proxy.InvokerInvocationHandler;
public class JavassistProxyFactory extends AbstractProxyFactory {
    public JavassistProxyFactory() {
    }

    public <T> T getProxy(Invoker<T> invoker, Class<?>[] interfaces) {
        return Proxy.getProxy(interfaces).newInstance(new InvokerInvocationHandler(invoker));
    }

    public <T> Invoker<T> getInvoker(T proxy, Class<T> type, URL url) {
        final Wrapper wrapper = Wrapper.getWrapper(proxy.getClass().getName().indexOf(36) < 0 ? proxy.getClass() : type);
        return new AbstractProxyInvoker<T>(proxy, type, url) {
            protected Object doInvoke(T proxy, String methodName, Class<?>[] parameterTypes, Object[] arguments) throws Throwable {
                return wrapper.invokeMethod(proxy, methodName, parameterTypes, arguments);
            }
        };
    }
}
其实上面最重要的就是InvokerInvocationHandler.
我们看一个运行中创建的动态代理的例子:
public class proxy0 implements ClassGenerator.DC, EchoService, DemoService {
    public static Method[] methods;
    private InvocationHandler handler;

    public proxy0(InvocationHandler invocationHandler) {
        this.handler = invocationHandler;
    }

    public proxy0() {
    }

    public String sayHello(String string) {
        Object[] arrobject = new Object[]{string};
        Object object = this.handler.invoke(this, methods[0], arrobject);
        return (String)object;
    }
}
也就是说我们远程调用一个方法时会触发handler的invoke方法:
public class InvokerInvocationHandler implements InvocationHandler {
    private final Invoker<?> invoker;

    public InvokerInvocationHandler(Invoker<?> handler) {
        this.invoker = handler;
    }

    public Object invoke(Object proxy, Method method, Object[] args) throws Throwable {
        String methodName = method.getName();
        Class<?>[] parameterTypes = method.getParameterTypes();
        if (method.getDeclaringClass() == Object.class) {
            return method.invoke(this.invoker, args);
        } else if ("toString".equals(methodName) && parameterTypes.length == 0) {
            return this.invoker.toString();
        } else if ("hashCode".equals(methodName) && parameterTypes.length == 0) {
            return this.invoker.hashCode();
        } else if ("equals".equals(methodName) && parameterTypes.length == 1) {
            return this.invoker.equals(args[0]);
        } else {
            RpcInvocation invocation;
            if (RpcUtils.hasGeneratedFuture(method)) {
                Class<?> clazz = method.getDeclaringClass();
                String syncMethodName = methodName.substring(0, methodName.length() - "Async".length());
                Method syncMethod = clazz.getMethod(syncMethodName, method.getParameterTypes());
                invocation = new RpcInvocation(syncMethod, args);
                invocation.setAttachment("future_generated", "true");
                invocation.setAttachment("async", "true");
            } else {
                invocation = new RpcInvocation(method, args);
                if (RpcUtils.hasFutureReturnType(method)) {
                    invocation.setAttachment("future_returntype", "true");
                    invocation.setAttachment("async", "true");
                }
            }

            invocation.setAttachment("application", this.invoker.getUrl().getParameter("application", ""));
            return this.invoker.invoke(invocation).recreate();
        }
    }
}
假如我们使用默认的dubbo协议,就会调用DubboInvoker的doInvoke方法,然后执行后续的流程。本章主要说代理,所以后面的流程就不介绍了。
说完消费端服务调用,再说一下服务端服务暴露使用的代理。
在我之前的一篇文章中: Dubbo使用简单介绍与启动流程以及请求响应流程 ,已经介绍了服务暴露的过程。主要说一下代理相关的。
在服务暴露过程中会调用ServiceConfig.doExportUrlsFor1Protocol方法。该方法有比较重要的三个语句:
 Invoker<?> invoker = proxyFactory.getInvoker(this.ref, this.interfaceClass, registryURL.addParameterAndEncoded("export", url.toFullString()));
                        DelegateProviderMetaDataInvoker wrapperInvoker = new DelegateProviderMetaDataInvoker(invoker, this);
                        Exporter<?> exporter = protocol.export(wrapperInvoker);
第一句就是通过代理将内部接口实现转换为invoker。代理工程是通过SPI扩展获取的,上文中已经讲述了。
就那Javassit为例子:
public <T> Invoker<T> getInvoker(T proxy, Class<T> type, URL url) {
        final Wrapper wrapper = Wrapper.getWrapper(proxy.getClass().getName().indexOf(36) < 0 ? proxy.getClass() : type);
        return new AbstractProxyInvoker<T>(proxy, type, url) {
            protected Object doInvoke(T proxy, String methodName, Class<?>[] parameterTypes, Object[] arguments) throws Throwable {
                return wrapper.invokeMethod(proxy, methodName, parameterTypes, arguments);
            }
        };
通过代理,内部通过反射或者动态生成字节码来调用目标ref的方法。
可以看一下官网给出的调用过程就很清楚了:
      —> DubboProtocol.requestHandler#reply(ExchangeChannel, Object)
          —> Filter#invoke(Invoker, Invocation)
            —> AbstractProxyInvoker#invoke(Invocation)
              —> Wrapper0#invokeMethod(Object, String, Class[], Object[])
                —> DemoServiceImpl#sayHello(String)
三、Springboot代理应用
Spring实现了AOP,而其中的实现主要是使用了AOP框架,而利用动态代理可以较好地完成横向切面编程。
在spring家族框架中,采用的代理方式就是动态代理,没有静态代理。且JDK代理和CGLIB代理都用到了。选择原则就是如果实现了接口,就自动采用JDK动态代理,否则采用CGLib代理。
本文主要分析Springboot是如何使用动态代理的,其余不做过多描述。
学习Spring AOP之前的确需要学习一下Spring的IOC,明白Bean的概念和创建等等,说实话,我也不是特别了解,还是在学习的过程中。总之在实现AOP增强的地方,spring会创建代理对象(有一些情况,比如使用事务的service,也会创建代理对象)。
主要知道在获取某个对象时,并不是真正的获取对象本身,其实都是获取代理对象。本文就从ProxyFactoryBean.getObject入手。
 @Nullable
    public Object getObject() throws BeansException {
        this.initializeAdvisorChain();
        if (this.isSingleton()) {
            return this.getSingletonInstance();
        } else {
            if (this.targetName == null) {
                this.logger.info("Using non-singleton proxies with singleton targets is often undesirable. Enable prototype proxies by setting the 'targetName' property.");
            }

            return this.newPrototypeInstance();
        }
    }
我们拿单例类型对象为例子:
 private synchronized Object getSingletonInstance() {
        if (this.singletonInstance == null) {
            this.targetSource = this.freshTargetSource();
            if (this.autodetectInterfaces && this.getProxiedInterfaces().length == 0 && !this.isProxyTargetClass()) {
                Class<?> targetClass = this.getTargetClass();
                if (targetClass == null) {
                    throw new FactoryBeanNotInitializedException("Cannot determine target class for proxy");
                }

                this.setInterfaces(ClassUtils.getAllInterfacesForClass(targetClass, this.proxyClassLoader));
            }

            super.setFrozen(this.freezeProxy);
            this.singletonInstance = this.getProxy(this.createAopProxy());
        }

        return this.singletonInstance;
    }
获取代理的方法(ProxyFactory):
 public static Object getProxy(TargetSource targetSource) {
        if (targetSource.getTargetClass() == null) {
            throw new IllegalArgumentException("Cannot create class proxy for TargetSource with null target class");
        } else {
            ProxyFactory proxyFactory = new ProxyFactory();
            proxyFactory.setTargetSource(targetSource);
            proxyFactory.setProxyTargetClass(true);
            return proxyFactory.getProxy();
        }
    }
public AopProxy createAopProxy(AdvisedSupport config) throws AopConfigException {
if (!config.isOptimize() && !config.isProxyTargetClass() && !this.hasNoUserSuppliedProxyInterfaces(config)) {
return new JdkDynamicAopProxy(config);
} else {
Class<?> targetClass = config.getTargetClass();
if (targetClass == null) {
throw new AopConfigException("TargetSource cannot determine target class: Either an interface or a target is required for proxy creation.");
} else {
return (AopProxy)(!targetClass.isInterface() && !Proxy.isProxyClass(targetClass) ? new ObjenesisCglibAopProxy(config) : new JdkDynamicAopProxy(config));
}
}
}JDK JdkDynamicAopProxy:
 public Object getProxy(@Nullable ClassLoader classLoader) {
        if (logger.isTraceEnabled()) {
            logger.trace("Creating JDK dynamic proxy: " + this.advised.getTargetSource());
        }

        Class<?>[] proxiedInterfaces = AopProxyUtils.completeProxiedInterfaces(this.advised, true);
        this.findDefinedEqualsAndHashCodeMethods(proxiedInterfaces);
        return Proxy.newProxyInstance(classLoader, proxiedInterfaces, this);
    }
其invoke方法:
   @Nullable
    public Object invoke(Object proxy, Method method, Object[] args) throws Throwable {
        Object oldProxy = null;
        boolean setProxyContext = false;
        //目标对象
        TargetSource targetSource = this.advised.targetSource;
        Object target = null;

        Class var9;
        try {
            if (!this.equalsDefined && AopUtils.isEqualsMethod(method)) {
                Boolean var19 = this.equals(args[0]);
                return var19;
            }

            if (!this.hashCodeDefined && AopUtils.isHashCodeMethod(method)) {
                Integer var18 = this.hashCode();
                return var18;
            }

            if (method.getDeclaringClass() != DecoratingProxy.class) {
                Object retVal;
                if (!this.advised.opaque && method.getDeclaringClass().isInterface() && method.getDeclaringClass().isAssignableFrom(Advised.class)) {
                    retVal = AopUtils.invokeJoinpointUsingReflection(this.advised, method, args);
                    return retVal;
                }

                if (this.advised.exposeProxy) {
                    oldProxy = AopContext.setCurrentProxy(proxy);
                    setProxyContext = true;
                }

                target = targetSource.getTarget();
                Class<?> targetClass = target != null ? target.getClass() : null;
                  //获取可以应用到此方法上的Interceptor列表
                List<Object> chain = this.advised.getInterceptorsAndDynamicInterceptionAdvice(method, targetClass);
           //如果没有可以应用到此方法的通知(Interceptor),此直接反射调用 method.invoke(target, args)

                if (chain.isEmpty()) {
                    Object[] argsToUse = AopProxyUtils.adaptArgumentsIfNecessary(method, args);
                    retVal = AopUtils.invokeJoinpointUsingReflection(target, method, argsToUse);
                } else {
                    MethodInvocation invocation = new ReflectiveMethodInvocation(proxy, target, method, args, targetClass, chain);
                    retVal = invocation.proceed();
                }

                Class<?> returnType = method.getReturnType();
                if (retVal != null && retVal == target && returnType != Object.class && returnType.isInstance(proxy) && !RawTargetAccess.class.isAssignableFrom(method.getDeclaringClass())) {
                    retVal = proxy;
                } else if (retVal == null && returnType != Void.TYPE && returnType.isPrimitive()) {
                    throw new AopInvocationException("Null return value from advice does not match primitive return type for: " + method);
                }

                Object var13 = retVal;
                return var13;
            }

            var9 = AopProxyUtils.ultimateTargetClass(this.advised);
        } finally {
            if (target != null && !targetSource.isStatic()) {
                targetSource.releaseTarget(target);
            }

            if (setProxyContext) {
                AopContext.setCurrentProxy(oldProxy);
            }

        }

        return var9;
    }
上面获取Intercept列表会将所有Advisor转换为MethodIntercept,具体可见DefaultAdvisorChainFactory.getInterceptorsAndDynamicInterceptionAdvice方法。
CGLib: CglibAopProxy
看一下其intercept方法:
其实它的整体思路和JDK是相似的,这个没什么大的区别。
  private static class DynamicAdvisedInterceptor implements MethodInterceptor, Serializable {
        private final AdvisedSupport advised;

        public DynamicAdvisedInterceptor(AdvisedSupport advised) {
            this.advised = advised;
        }

        @Nullable
        public Object intercept(Object proxy, Method method, Object[] args, MethodProxy methodProxy) throws Throwable {
            Object oldProxy = null;
            boolean setProxyContext = false;
            Object target = null;
            TargetSource targetSource = this.advised.getTargetSource();

            Object var16;
            try {
                if (this.advised.exposeProxy) {
                    oldProxy = AopContext.setCurrentProxy(proxy);
                    setProxyContext = true;
                }

                target = targetSource.getTarget();
                Class<?> targetClass = target != null ? target.getClass() : null;
                List<Object> chain = this.advised.getInterceptorsAndDynamicInterceptionAdvice(method, targetClass);
                Object retVal;
                if (chain.isEmpty() && Modifier.isPublic(method.getModifiers())) {
                    Object[] argsToUse = AopProxyUtils.adaptArgumentsIfNecessary(method, args);
                    retVal = methodProxy.invoke(target, argsToUse);
                } else {
                    retVal = (new CglibAopProxy.CglibMethodInvocation(proxy, target, method, args, targetClass, chain, methodProxy)).proceed();
                }

                retVal = CglibAopProxy.processReturnType(proxy, target, method, retVal);
                var16 = retVal;
            } finally {
                if (target != null && !targetSource.isStatic()) {
                    targetSource.releaseTarget(target);
                }

                if (setProxyContext) {
                    AopContext.setCurrentProxy(oldProxy);
                }

            }

            return var16;
        }
说完动态代理,再和静态代理比较一下,实际上,动态代理最大的优势并不是在于相比于静态代理少写了一些代码,当然这是优势,只是不是最大优势,动态代理最大的优势是其可以在不了解目标类和接口未知的情况下,编写动态代理的动作,也就是说我们动态代理和原始类或者接口时解耦的,这样就使得我们使用代理的时候就特别的灵活。
参考资料:
Java动态代理机制详解(JDK 和CGLIB,Javassist,ASM)
Spring AOP中的JDK和CGLib动态代理哪个效率更高?
微信分享/微信扫码阅读